 Hi all, hope you enjoyed our previous blog post on How to start a Food Blog.
Today, we’ll take look at a simple step-by-step guide on how to make a website. Let’s dive in!
If you want to create the best-looking website all by yourself, then you’ll LOVE this guide.
Welcome to the most Simple ‘How to Make a Website’ Guide for Beginners.
How To Make a Website With WordPress?
Making a website has become fairly easy, thanks to the wonderful CMS – WordPress. You can now easily create a website for personal use or business purposes without much hassle. However, if you are building a website for business purposes, you need to ensure it reflects the professionalism that makes your brand stand out. In this guide on how to make a website with WordPress, we’ll take a look at how to install WordPress manually and its basic features. This will help you get started with installing and managing your own website.
Below listed are 9 (Super Easy Steps) on How to Make a Website by Installing WordPress under 5 mins.
Step #1. Choose the Right .com Domain & Web Hosting Plan
One important thing with domain names, the right one can instantly make your website a brand. Similarly, the wrong one can break it so hard before it even gets noticed. So, choose your domain name very carefully and wisely.
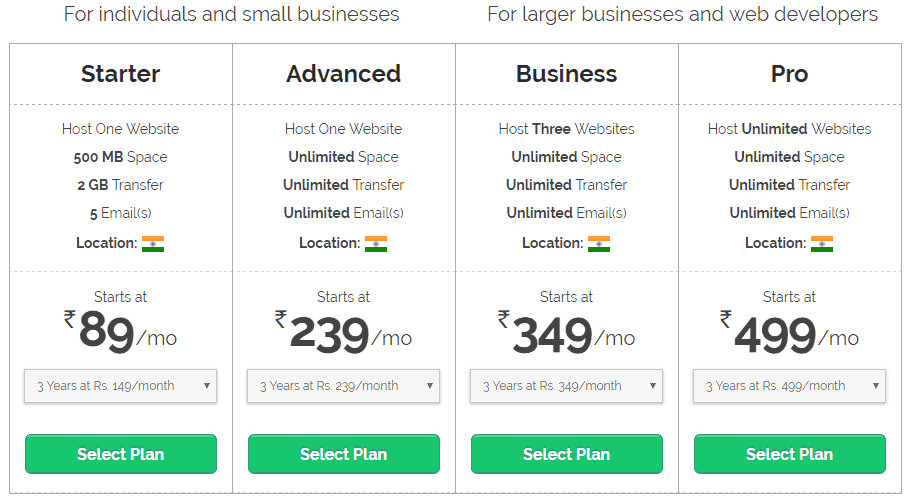
We suggest from experience, there is nothing like Bigrock, where your website should be hosted for as low as Rs. 59/month. Also if you Sign up using this (EXCLUSIVE) link, you’ll get a MASSIVE 50% DISCOUNT on your Domain + Web Hosting Plan for the 1st year (this discounted price is through BigrockCoupon.in Only)!
When you create a website (build your own website), hosting is an extremely important step.
Let us tell you why…
Your web hosting company will determine some of the very crucial aspects of your website: security, loading speed, uptime, and backup or data retrieval options. It’s therefore, vital to choose best hosting providers India that will empower you, and never limit you.
Bigrock is one such example of a reliable web hosting provider. Plus, it provides great discounts on hosting and domain via BigRock coupon and BigRock domain coupons respectively.
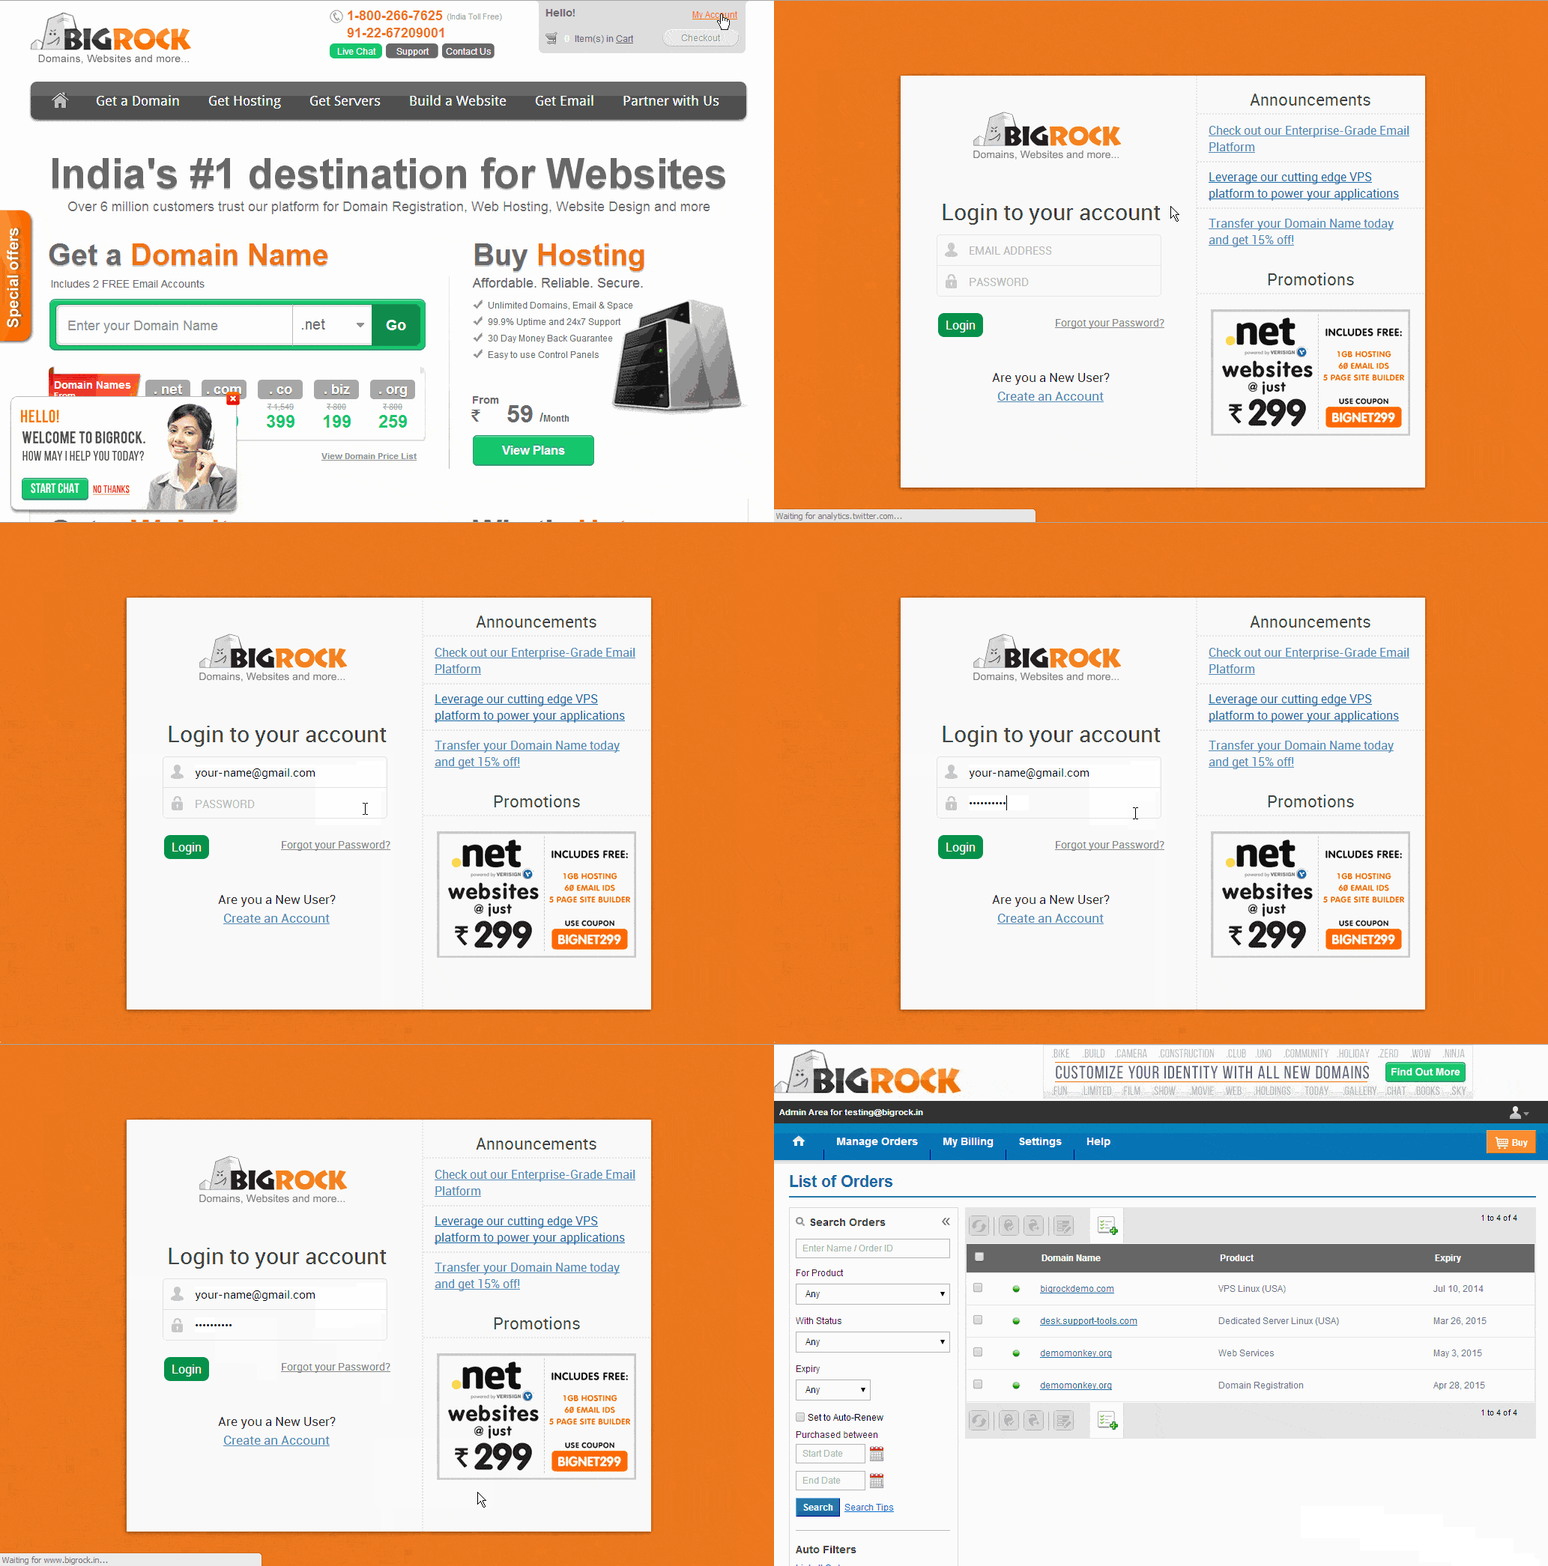
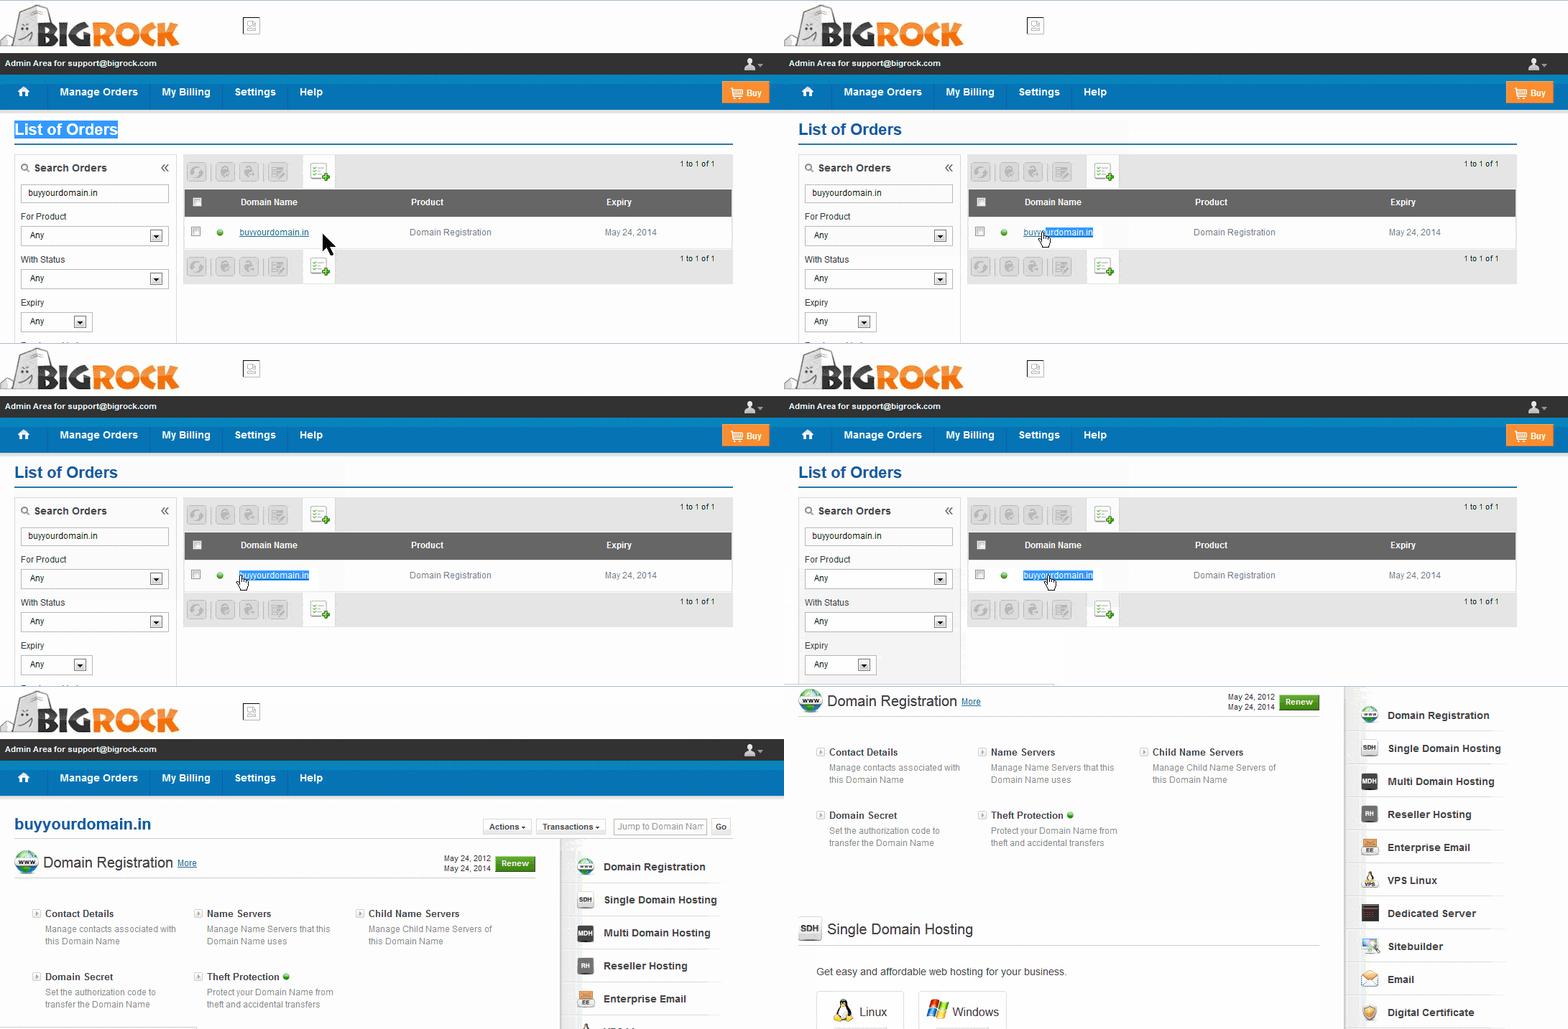
Also, here is a video tutorial on how to buy a domain, hosting and install WordPress on Bigrock.
Here are some of the key questions you should ask yourself when choosing a web host:
- How many domains can you host?
- Does it support WordPress?
- Does it offer dedicated WordPress Hosting in India?
- Is it easy to make a WordPress website using this host?
- What uptime percentage do they guarantee?
- How much storage and bandwidth do they allocate?
- What technology and security features do they have in place?
- Do they Offer cPanel?
- Do they have Famous 5-minute install?
- Do they have a reliable 24×7 Technical Service Support System?
Reputation of the Company
- When was the hosting company founded?
- What are their customers saying about them?
Hosting Plans & Pricing
- What do you get from the plan you are about to purchase?
- How much is the plan for?
- Do they offer domain registration services?
- Do they have any offers on Domain or Hosting?
- Are there any extra costs for IP addresses, etc?
- Can you upgrade the current plan in future?
- Do they Offer Money Back Guarantee
People with first-hand experience with Bigrock Hosting are one of the best resources for recommendations. These could be friends, family or colleagues. If you don’t know anyone with experience, here are few Bigrock Review from real users reviewing the Bigrock service.
Also, here are some hosting comparison reviews if you are looking for a broader web hosting choice.
Step #2. Connect your Domain to your Host’s Nameservers
Now that you have both the domain name and a hosting account, you need to configure your domain with your host’s nameservers. This process is however not necessary if your domain name came with a hosting package.
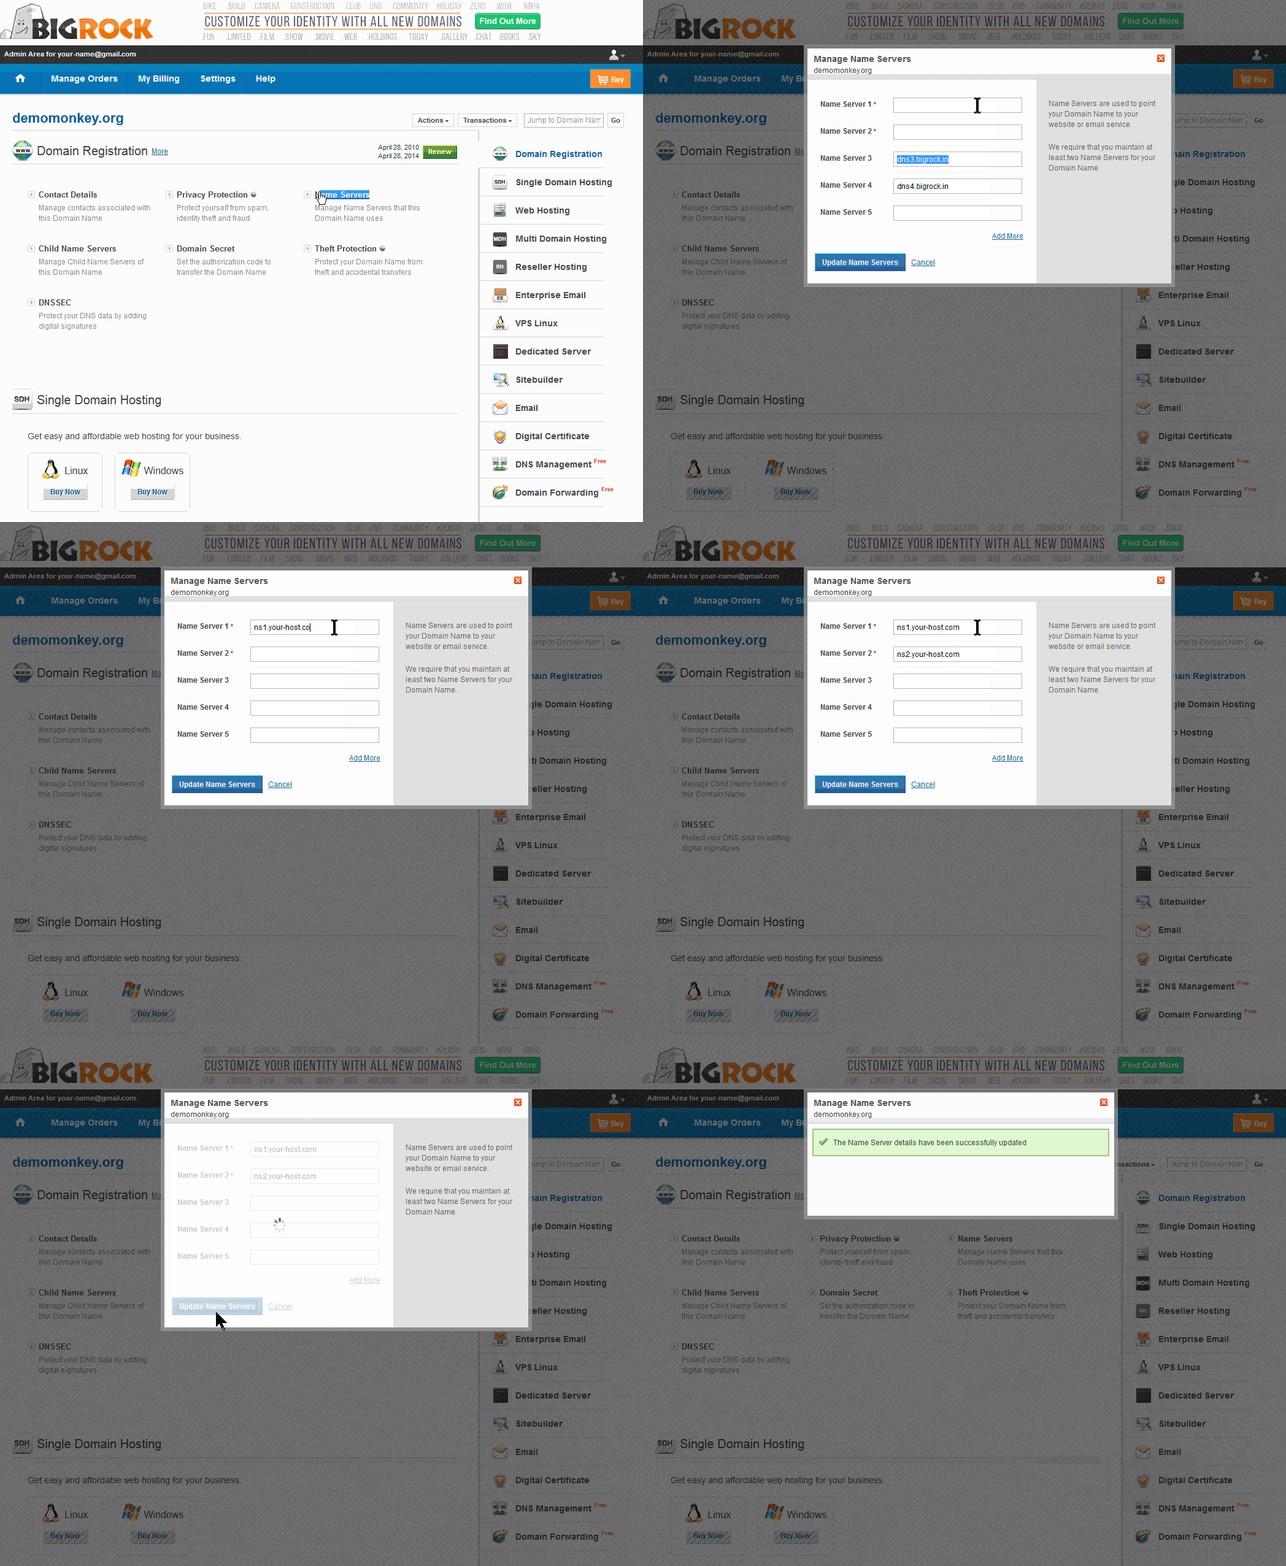
Once you signed up, the hosting provider should have given you the names of the nameservers. They look like ns1.nameserver.com. Found it? Now, navigate to the control panel of your domain and look for something that says “change/configure nameservers”. That’s where you enter the nameservers. Keep in mind that you may need to wait for up to 24 hours before the changes can be propagated.
To check if it’s working, enter the URL of your domain in a browser and see if it shows your host’s landing page. Should you experience any problems locating where to change the nameservers, contact the support team of your domain registrar. They should be happy to help. Almost all domain registration companies have a dedicated support, who’ll be happy to help you.
Step #3. Download and Upload WordPress Manually
WordPress is undoubtedly the best content management system (CMS) for beginners. It’s free, the easy to use, search engine friendly, responsive (mobile and tablets friendly), and has an endless number of themes and plugins.
Certainly, there are many paid and open-source CMS’ available, but none can hold a candle to WordPress when it comes to security, ease of use, and reliability.
On its sturdy back is over 50 million websites, and so many Web Developers would never contemplate on using anything else. Before we begin, let’s agree that WordPress is the way to go and there’s no looking back. Now let me show you how to make a website Step by Step.
Download the latest version of WordPress and unzip it in a new folder on your computer. The next step is uploading it to your hosting account. File Transfer Protocol (FTP) is what you should use for this; it’s a way to transfer files between a computer and the host’s servers.
You need to install an FTP client first (FileZilla is a good one), which will ask for your credentials (username, hostname, and password). These are normally given to you by your host. The FTP address is quite similar to ftp.domainname.com.
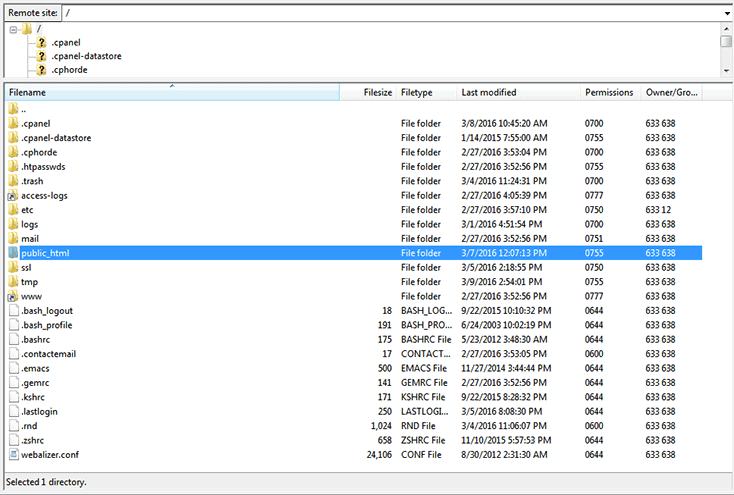
Once a connection to the server via FTP is established, you are given a whole list of folders. Look for one titled public_html or your domain name. that’s where you will upload WordPress. For your website to be in the root domain, then upload WordPress directly. Otherwise, if you want it in a subfolder, then you need to first create that folder and upload it there.
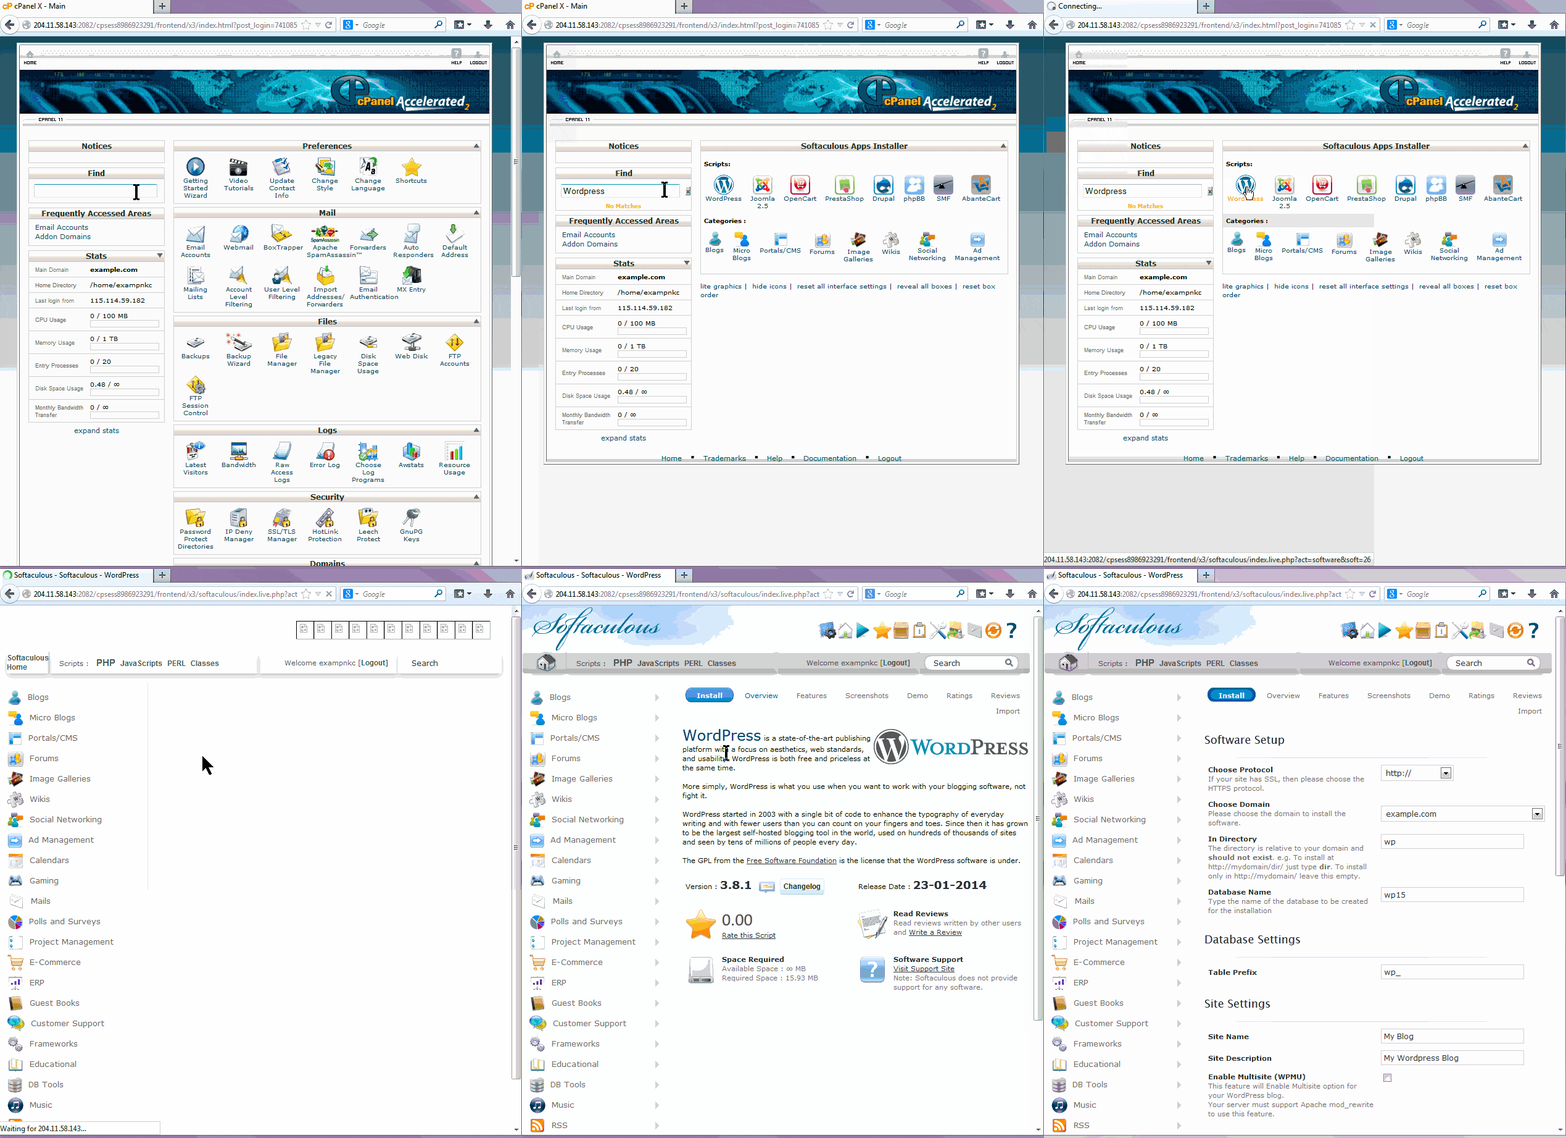
You may also use the quick install option within the cPanel know, as ‘Softaculous’ as seen below,
Step #4. Create a MySQL Database
All your WordPress data is stored in a database, including all of the content (such as articles, comments, pages etc.), user data, and configurations. Every time page loads, WordPress will query the database for the needed information like the title, categories, publishing date, tags, and the content.
You should use the control panel of your host to create a database, as well as the username and password to connect to WordPress. For any questions about this step, your host will be happy to assist you.
Now rename a file called wp-config-sample.php to wp-config.php (just remove ‘-sample’) using your FTP client. Next, open the file using a text editor. It should be something like this:
- MySQL Hostname:
Define (‘DB_HOST’, ‘localhost’); - The name of your WordPress database:
Define (‘DB_NAME’, ‘database_name_here’); - Database username:
Define (‘DB_USER’, ‘username_here’); - Database password:
Define (‘DB_PASSWORD’, ‘password_here’);
Once you found those lines, enter all of your credentials by replacing the placeholders and save the edited file to the server.
Step #5. Install WordPress
WordPress will ask for some basic information before its installation commences. Enter these and create your account. This process is relatively straightforward and short.
However, for security purposes, don’t use the username ‘admin’ as it’s easily guessable by hackers. You will be able to log into the admin panel once you submit the required information.
Step #6. Understand the Admin Dashboard
Now that your website is active, the next step should be configuring it to how you want it to be like. To do this, you need to access the admin panel www.yourdomainname.com/wp-admin. Log in with your username and password to access the dashboard.
From here, you can add, delete, and modify anything on your website. To help you understand how things work around here, let me explain some key elements of the Dashboard.
The Navigation menu is the most important part, found on the left-hand side of the interface. It gives you access to a variety of tools that are essential when managing a website. Some of the tools you are likely to use most include:

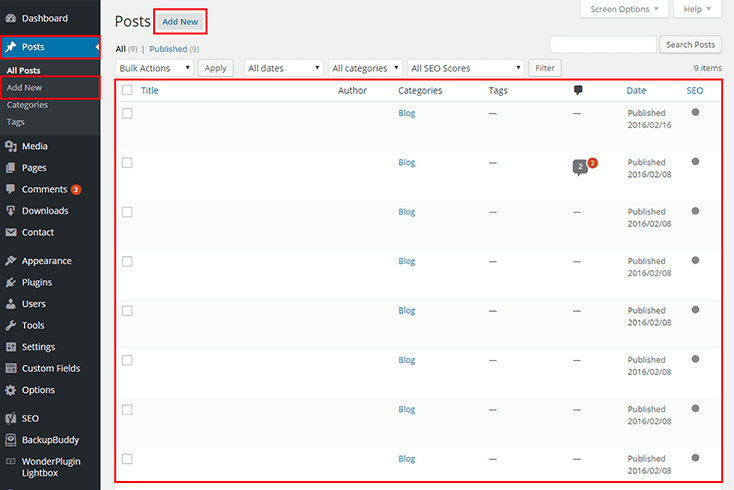
- Posts:This is a vital section for those websites with an active blog. From here, you can publish, add, edit, and archive blog articles.
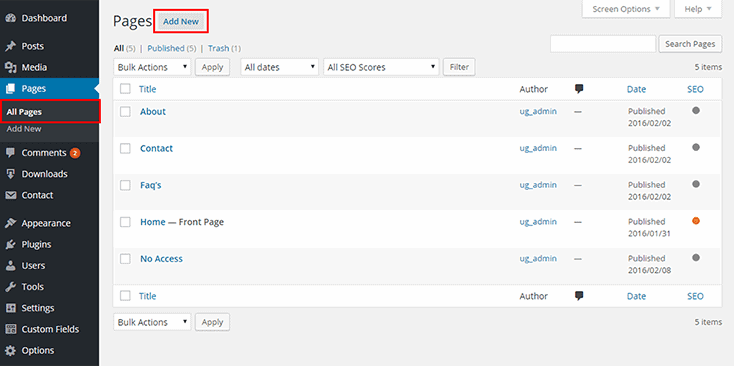
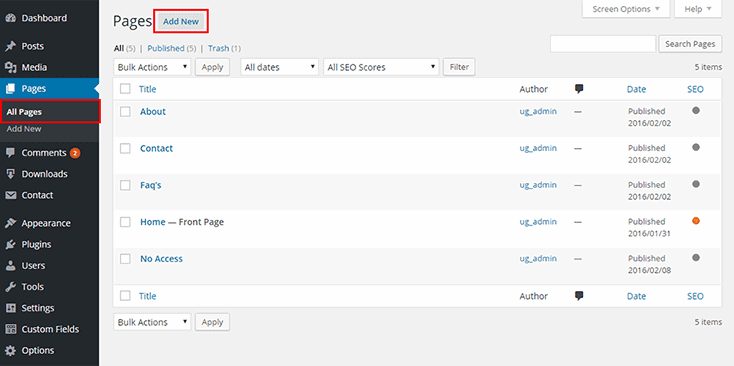
- Pages: This allows you to create different pages for your website such as Contact Us, About Us, Product Catalogue,etc.
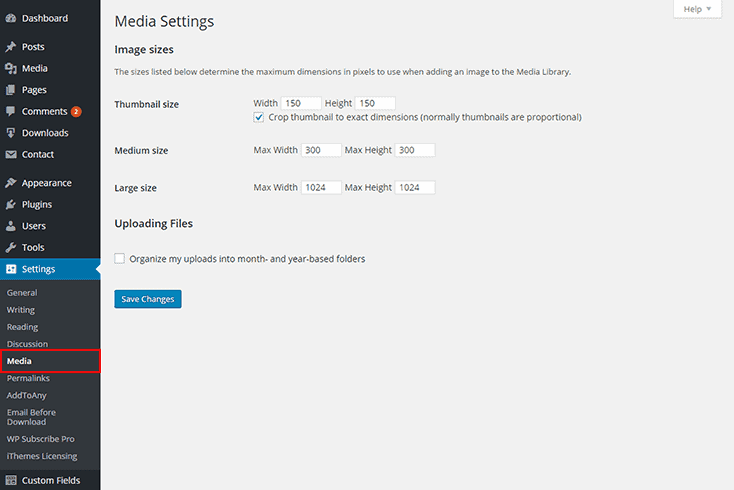
- Media: The place to go if you want to add media files (audio, images, and videos) to your website.
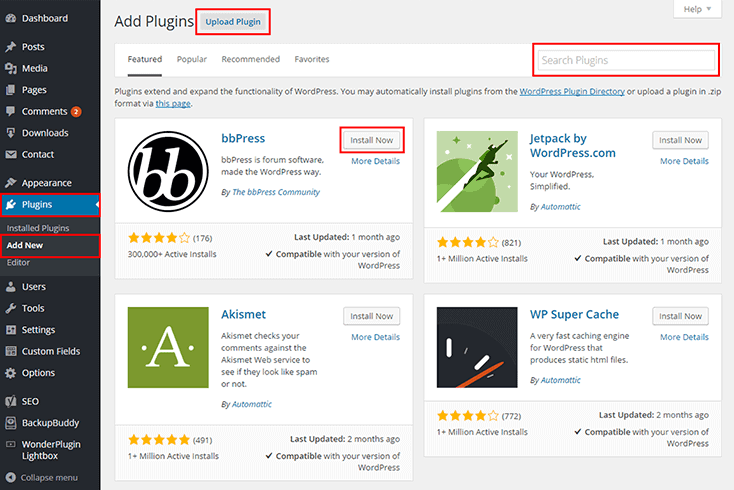
- Plugins: A very important section which allows you to access the huge collection of WordPress plugins.These can help to make your website work, look, and rank better.
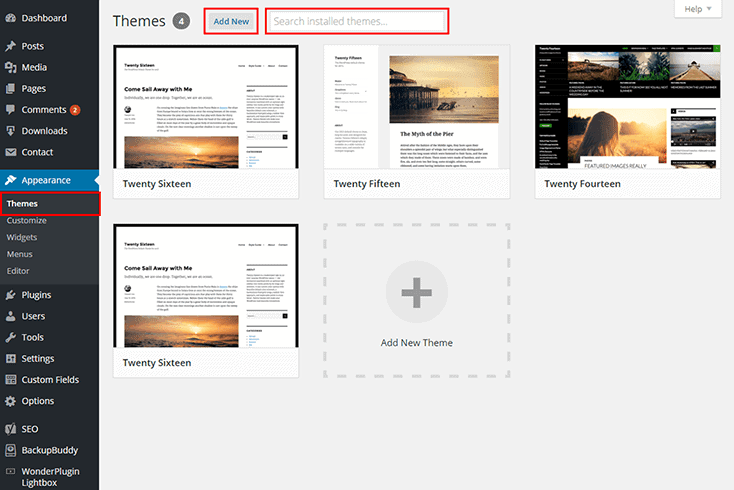
- Appearance: As the most interesting bit on your dashboard, this section allows you to customize your website’s appearance. You can customize every aspect of your site including its theme, colors, fonts, backgrounds,etc.
- Settings: This section is meant to allow you to manage and configure your installation options such as the URL, website’s name, date format, media and comments settings, etc.

Step #7. Choose a WordPress Theme
When you build your own website, it is important to remember that the design foundation of your website lies on your WordPress theme. There are literally thousands of free or premium themes to choose from, with the option to have one custom designed, though it’s a considerably more expensive option.
Regardless of what your website is about, whether is about food, real estate, law, design or anything else, you will find lots of suitable themes. However, the never-ending quest is finding the perfect one.

Here’s a checklist to help you find a great theme:
- Incredible design
- Rock-solid coding
- Valid CSS and HTML
- Outstanding readability
- Compatible with popular plug-ins
- Compatible with the latest WordPress version
- Extensive documentation and Support
Due to the sheer amount of competition among theme developers, all of the reputable developers will offer all these features as standard. But, when you make your own website, you need to focus more on what the audience like, and what they are likely to respond to; not your personal preferences.
Many people, while creating (building) a website with WordPress make the mistake of getting lost in their own personal styles when choosing a theme, and the result is poor customer engagement. Well, if it’s a personal blog, that is fine. But for businesses, put your customers first. Also, read this Avada WordPress theme review to know why it is the best WordPress theme to start your website with.
Step #8. Secure your Website
While WordPress is a relatively secure CMS out of the box, it has a few weaknesses that need to be ironed out. Keep in mind that no website is 100% secure, and your focus should be in putting in a little effort to make it as difficult as possible for anyone to maliciously exploit your website.
It doesn’t matter how much you invest in keeping your website secure, as long as it’s live, there is always a chance that someone will try to exploit it. For this reason, backing up your website’s data is imperative. The following steps can help you improve your WordPress website security:
- Update WordPress to the latest version regularly: The updates usually come with essential functional and security fixes. Keeping it up to date will protect you from old exploits.
- Avoid using wp_ as the prefix for your database table:leaving it as wp_ creates a loophole where malicious persons can search for that specifically to facilitate their exploits. Changing this prefix to something unique will help make your database less vulnerable.
- Remove the admin username: The malicious hackers are aware that the huge majority of users will put ‘admin’ as their username. This leaves them with only one piece of data to uncover: your password. Using a unique username will be an added security in that they have twice as many data to have to guess.
- Remove WordPress version information from the header of your website: when the malicious users are not aware of the version of WordPress you are using, they might have difficulties determining exactly how they can exploit your website, especially if the version is up to date.
If you are not comfortable doing the above steps manually, then you may use ithemes Free Security Plugin or ithemes Pro for Enhanced Security.
Step #9. Create the Essential Pages
When a user stumbles upon your website, you want them to find everything they need as easily as possible. You need to make this process quick. Thus, for this reason, when you build your own website, ensure that it has several basic pages that will help to enhance the usability of your website (site)
Having several basic pages will help to enhance the usability of your website. Ensure it has a homepage, an about page, contact page, and the products or careers page, depending on the nature of your website.
Final Word
That wasn’t so bad, was it?
We hope this step by step guide on how to make a website with WordPress, has helped you choose a domain name, hosting provider, download and install WordPress, choose a suitable theme, and enhance the functionality of your website.
After you’ve finished reading and following the guide, you should be equipped with all the necessary information to launch a fully functional WordPress website.
Now it’s time to promote your business and rank your website using a few On-Page SEO techniques. Also, do check out this WordPress website maintenance checklist which has listed down the best practices to keep your site optimised at all times.
If you have any questions then please feel free to comment them below. We’ll be happy to reply to comments and answer any questions.


Leave a Reply