SiteGround is the most popular hosting company worldwide that offers a range of web hosting features and hosting plans. It powers more than 200,000 sites in the webspace. It offers faster and secure web hosting that benefits small and medium-sized business organizations.
It offers website building support with different collaboration tools. It offers a great network with cloud integration. It is also suitable for creating a WordPress website. WordPress integration with SiteGround is easy as you can do it with some simple steps. There is also technical support available if you need any help in the installation of the WordPress website.
How to Install WordPress on SiteGround?
If you are looking for a simple guide that explains how to install WordPress on SiteGround, then you’ve come to the right place! SiteGround is a premium web hosting provider that offers automatic pre-installed set-up for WordPress with all web hosting packages. It also offers Softaculous WordPress installer, which is a semi-automatic route. The best part, just like creating a blog, no matter which route you choose, installing WordPress on SiteGround is easy. Thus, go ahead and check out this step-by-step SiteGround WordPress installation guide now.
A. Why SiteGround Hosting is Perfect for WordPress Installation?
SiteGround offers a full-service WordPress suite for all the websites hosted on the platform. It offers fast WordPress launch and installation that can help to build a suitable site within minutes. SiteGround offers unmatched WordPress integration, which helps to speed up a WordPress site. It also offers free SSL certificates and daily backups on the site.
This Best Hosting provider in India also lets you transfer different WordPress sites so that you can integrate with other available plugins. With managed WordPress integration, you’ll also get complete security and updates. Read this SiteGround review to know more.
B. How to Install WordPress on SiteGround Hosting?
Step 1: Login to the SiteGround customer area on the main website. Now, click on the banner that states ‘get your new site up and running’. If you already have an account, you can select this option. Once you get there, you can then select WordPress pre-installed on this account.

Now, you’ll see a website service wizard. You’ll able to see options like ‘one-click installation’ and ‘free migration’. Choose the ‘get WordPress pre-installed on the SiteGround account’ and proceed further.
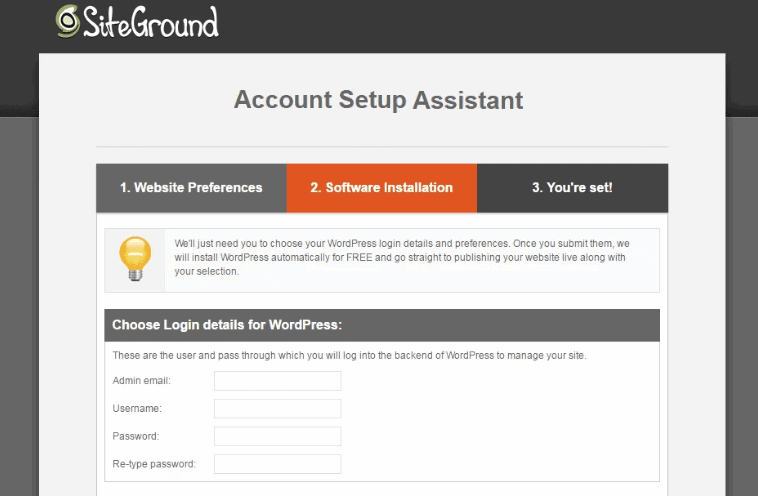
Step 2: Its time to choose the login details for your WordPress website. This is the main username and password that you will use (in the future) to login to your main WordPress site.

The password of the login should always be strong with a good character mix. Make use of LastPass to generate a strong password. Now, you’ll find the ‘account setup assistant’ page on the site.
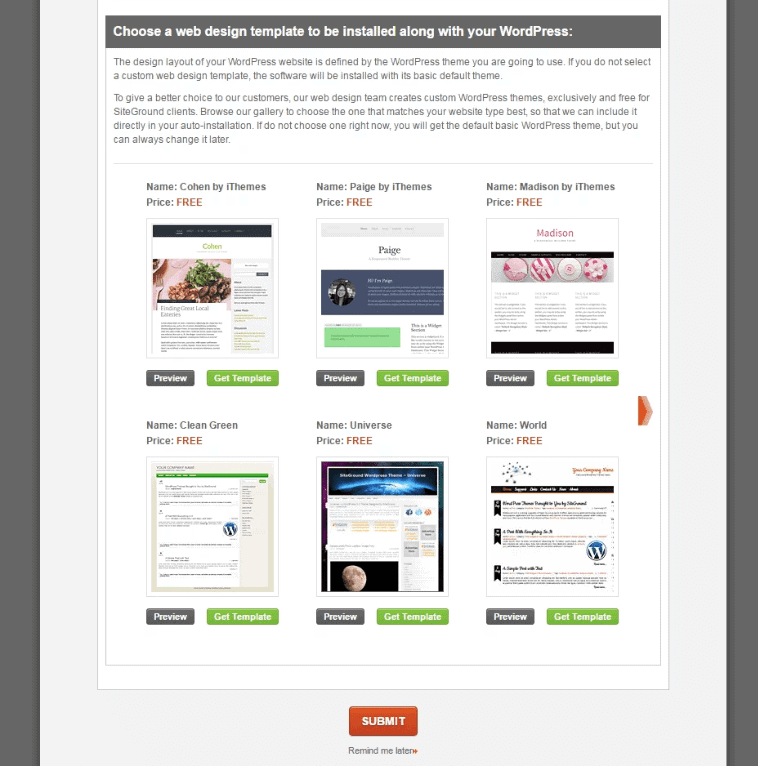
There will be an option of preference and software installation. You need to choose the ‘software installation’ option on this setup. After this, you’ll find a range of web designs and WordPress themes to choose from.
Now, you need to choose a WordPress theme to be installed for your site. If you don’t choose a WordPress theme, you’ll get a default basic theme. If you already have a WordPress theme, then don’t choose a WordPress template from this option.
Step 3: After choosing a specific theme for your site, you need to click submit and WordPress will be installed on your website. It will then be confirmed according to your preference.

You’ll be given the complete login details that will be emailed to you as well. The steps allow you to customize your installation on the SiteGround website.
C. Installation of WordPress on SiteGround Using Softaculous
This process can be a little time consuming as its more semi-automatic compared to direct installation. The Softaculous WordPress installer helps to customize your WordPress website.
a href=”https://softaculous.com/” target=”_blank”>Softaculous is a software script library that helps to automate the installation of open source applications like WordPress, Magento, and Joomla. It will help you to install your WordPress website on SiteGround as well.
So, if you are using this software, you can complete the installation process by following the steps below.
Step 1: Login to the ‘Custom area’ of the site and access the control panel. This is also known as the cPanel. Here you’ll find the WordPress installer icon. You need to click on that to continue further. You’ll be taken to a page that will provide you with an overview of WordPress.
![]()
Step 2: Click on the install button which will redirect you to the page with settings of WordPress website. Now, you’ll be redirected to the WordPress software settings page.

You need to configure this page stepwise or else you’ll lose on instant installation steps. Once you land on the WordPress software settings page, you need to follow the below steps for installation.
- Firstly you will need to select a protocol with which your WordPress site should be accessible.
- Now, you will have to choose a domain name suitable for your WordPress site. Select the domain name from the dropbox and continue further.
- Install in directory option should be left blank to install on the domain name directly. If you are installing in the subfolder of your website, then you will need to type the folder name. The folder name will be installed with the WP.
- The next step is to provide a site name for your WordPress website. Fill in the site name according to your preference. Now is the time to provide a site description or a suitable tagline for your WordPress website.
- Now, you will find ‘enable the multisite’ option. You need to uncheck this box, as you don’t want multisite enabled on the website.
- The next step is to fill in the admin username, enter it for your WordPress dashboard login. Also, provide the admin password for your WordPress dashboard login.
- Now is the time to choose a language you want your WordPress to be installed in. The list of languages that support installation is quite big, you’ll also find all the native language on this list. Still, the most preferred choice is English.
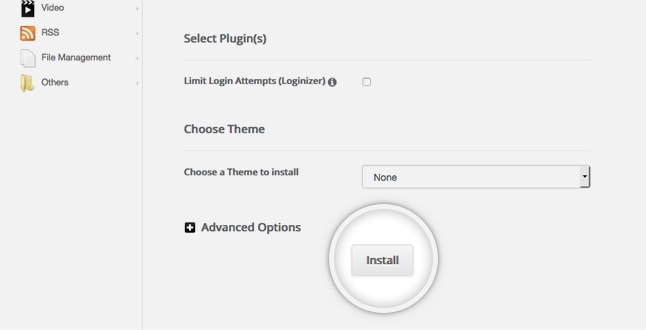
- Choose the limit login attempts plugin installed at the site. When you enable this option, it helps to boost the security of your WordPress website.
- Now, you need to choose a theme for installation. Unless you need to choose a theme, leave this option as it is. If you want, you can install it from the drop-down list of themes.
- The advanced options will let you rename the database name and the table prefix. You can leave the default values as it is.
- Now, the final step is to install. Click the install button and WordPress will begin installing. Once the installation part is complete, you’ll see the login details on the site. Your WordPress website is now installed on the SiteGround via Softaculous.
To sum up;
Siteground hosting WordPress installation will let you integrate with tools and plugins. So, you can create a customized version of your website. You’ll be able to edit themes and upload different plugins. You can easily install WordPress on SiteGround with the above simple steps. You just need to follow the protocol and rules of installation.
Leave a Reply