
You’d like to start blogging.
Right?
The only problem is that you don’t know how to start a blog. You’ve heard about all those people making big bucks online and you’d like to be next in line, because, hell, you’ve got bills to pay, but you just don’t know how to start a blog.
Well, don’t despair. No matter what you’ve read online, no matter how technical it seems, no matter the confusion you experience when trying to figure out how to start a blog, it really is not all that hard.
It used to be a headache way back. Back in the days before WordPress. Back when you had to know quite a bit of coding, some HTML, some CSS and especially a fair bit of PHP.
Recommended reading:
i) How to start a travel blog
ii) How to start a fashion blog
Nowadays though things are automated for the most part.
There are little programs called Plugins that take the automation of many functions right out of your hands and the good thing about many of them is that they are free.
The lead blogging software, called WordPress is free as well and it is a breeze to install.

Many web hosts have a special piece of software that makes the installation of WordPress a 5-minute experience for you.
There are so many resources online to help you start your own blog, that there’s really no reason to lose your beauty sleep over it.
In this complete guide, I will take you step-by-step through everything you need to know in order to successfully start a WordPress blog.
You will encounter many terms that might be unfamiliar to you along the way, but I can assure you that I will explain each and every term in a way that will make everything clear to you.
#1. What You Need To Know Before We Start
First of all, we need to lay the groundwork for the steps you will take in order to have a complete and fully functioning blog.
Following these steps to the tee will ensure that not only your blog is up and running in no time, but it will also ensure that you don’t encounter errors along the way.
I’d also like you to keep the following points in the back of your mind as you are preparing to create your blog. These points will help you keep things realistic, should you stray away from your intended purpose:
- Creating this blog and seeing it through to success requires quite a bit of time from your side. Can you set aside time to work on it?
- Having a clear picture of whom you want to read your blog helps you create content for that specific audience. Have you thought about who your intended audience is going to be?
- Starting a blog requires a small financial investment on your part. What one person might consider small, might be a huge sacrifice for another person. Do you have the finances to pay for your hosting, domain and buy any other services that you might need along the way?
Here’s a brief explanation of what you’ll encounter in each step:
1. Find a Domain Name and Hosting
Every human being on this earth has a name and all human beings should have a home. Although this is not always the case in poorer parts of the earth, ultimately everyone has a place to put their heads down at night.
Using this as an analogy, one could reason domains and hosting the same way. A domain could be likened to your name, whereas hosting could be likened to the place you reside at. Your name represents you, the same way as your domain represents your website. Is that clear?
Keep in mind, though, that a top 10 hosting in india can accommodate many different members of your family. With that, I mean that you can have many different domains hosted on your account on your chosen web host.
We will later look at what you need to know before you purchase a domain name, what to look for in a WordPress web host and how to link your chosen domain name to the web host. Apart from that, we will also create a place on the web host that will serve as a home for your website.
Don’t worry too much if you’ve lost me there. It will all become clearer once we start doing it.
2. How to Set Up A Blog
Now here is where things start to get really interesting. This is where we roll up our sleeves and get our hands dirty. You’ll understand exactly what I mean once we get there, but this is the place where you get to observe as well as participate in the behind-the-scenes of every successful blog.
We will install WordPress on our blog by clicking a couple of buttons and answering a few questions, and voila! We have a blog.
Not too much excitement here, as the journey just actually started. Hang on!
3. The Essential Tweaks For Your Blog
After installing our blog, it’s time to head over there and log in. Once we’ve done that we will start to tweak our blog to look the way we want it to look at changing themes, adding a logo and installing a couple of essential plugins.
I believe you will spend a great deal of time in this section, as you install and uninstall a couple of themes till you have the one you desire.
4. How To Create That First Blog Post
This section is quite self-explanatory and doesn’t need much input from me. We will go through the different parts of a blog post, ultimately create our first post and publish it.
We will also look at the necessity of pages, the difference between posts and pages, and how to set up your pages. Here is also a fantastic resource on how to write a blog post.
5. The Security Of Your Blog

The security of your blog is of the utmost importance.
In fact, it is the one thing you should always keep in the back of your mind regarding your blog.
Hacking has become such a common thing, that your site will be up and running one day and completely gone the next.
In this section, we will look at plugins you can install that will take a backup of your site on a regular basis.
6. Traffic, Promotion And Making Money
What’s the use of doing all of this if nobody sees it? Or better yet, what’s the use, if you don’t put some killer epic stuff on there and make money off of it. So, you need to learn how to plan your content, put it on and promote your blog on Facebook and other social channels.
That’s what we’ll take a look at here. Of course there’s still a whole lot of other stuff involved to further enhance your blog, but for now, this is more than sufficient to start you off on your blogging journey.
So, buckle up and let’s go!
#2. Find a Domain Name and Hosting
Choosing Your Domain Name
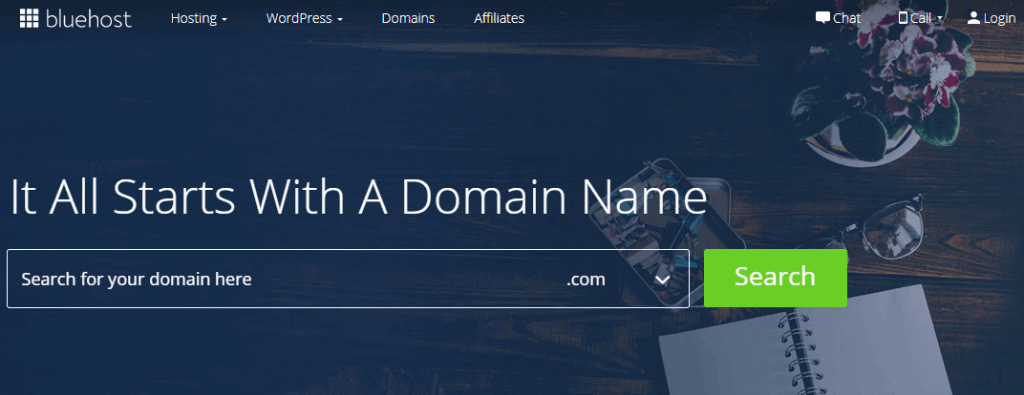
The first thing we need to do is find a domain name. As I’ve mentioned before, a domain name is the unique identifier of your website. It looks like this – www.createmyblog.com
Now, when choosing a domain name, you don’t just go for any old name. You have to ensure that your name is easy-on-the-eye and tongue. Probably short as well. Studies have shown that the top websites have names with six characters or less. Lastly, think brand.
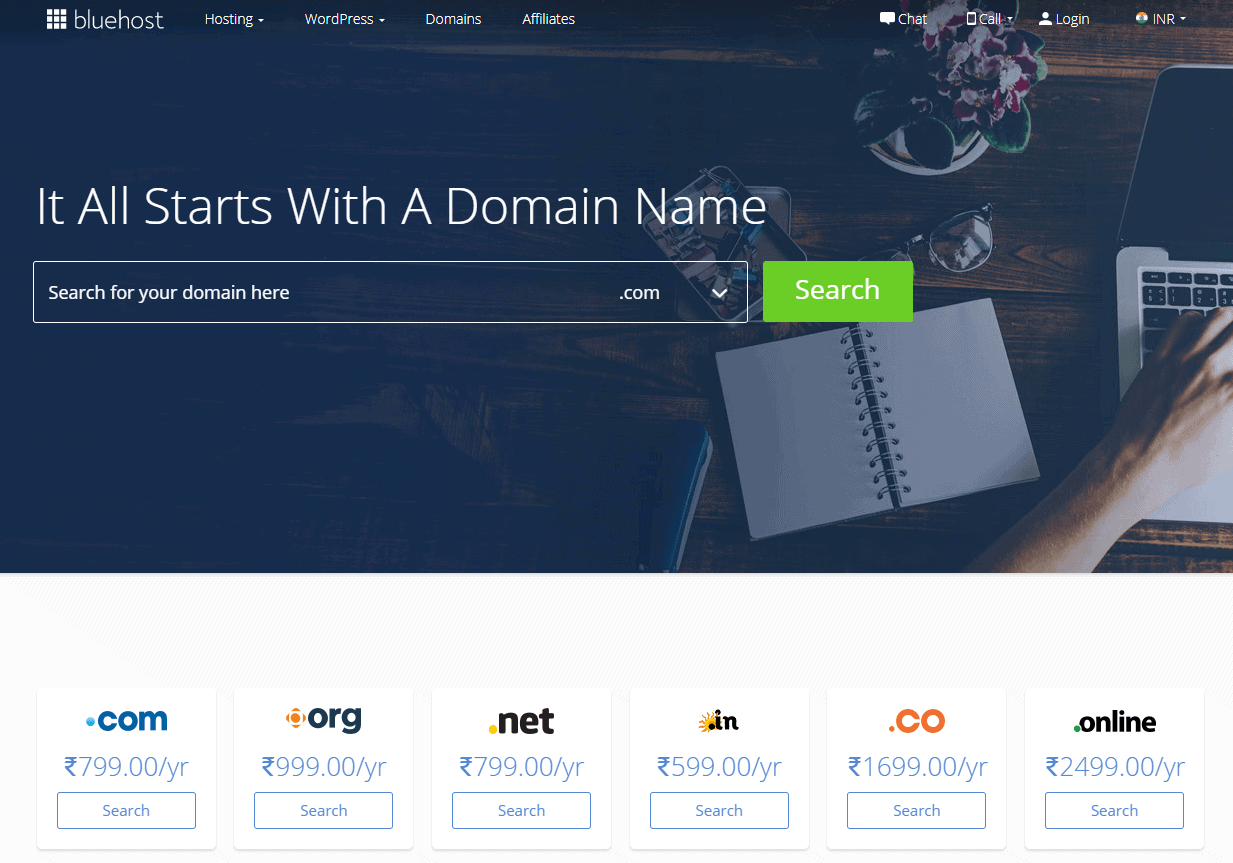
I’m not saying that your domain name ought to adhere to these guidelines per say because you can just about totally rock it with a blog having the most obscure name. In the end, it’s the content that pulls people to your blog, as well as how well you position yourself with SEO.
Now, go out there and brainstorm your domain name and once you find that perfect name buy it instantly with the help of these Bluehost Domain Coupons.
Get Hosting
Web hosting is what you need in order to give your domain name a home. In this guide, we will go with Bluehost India, our favourite web hosting company. (Read this unbiased Bluehost review to know why!)
Let’s head on over to BlueHost India. Here is the best Offer for You!
Now, ow to buy hosting from Bluehost India just follow the below-mentioned steps.
- Step 1. Once on BlueHost, click on that big green button called “get started now”
- Step 2. Our next step is where we can choose a name for our new domain. If you already have a domain, you can just fill in the name in the box. Or you have the option to choose from a variety of domain name types, by selecting “I want to buy a new Domain Name”
- Step 3. You also get to choose the package information, you have the option to pay for 1, 2 or 3 years in advance. Enter Bluehost Coupon, check your total amount and click on the “proceed to payment” button.
- Step 4. Lastly, Sign in and fill everything in as accurately as possible. Make your payments and we’re done.
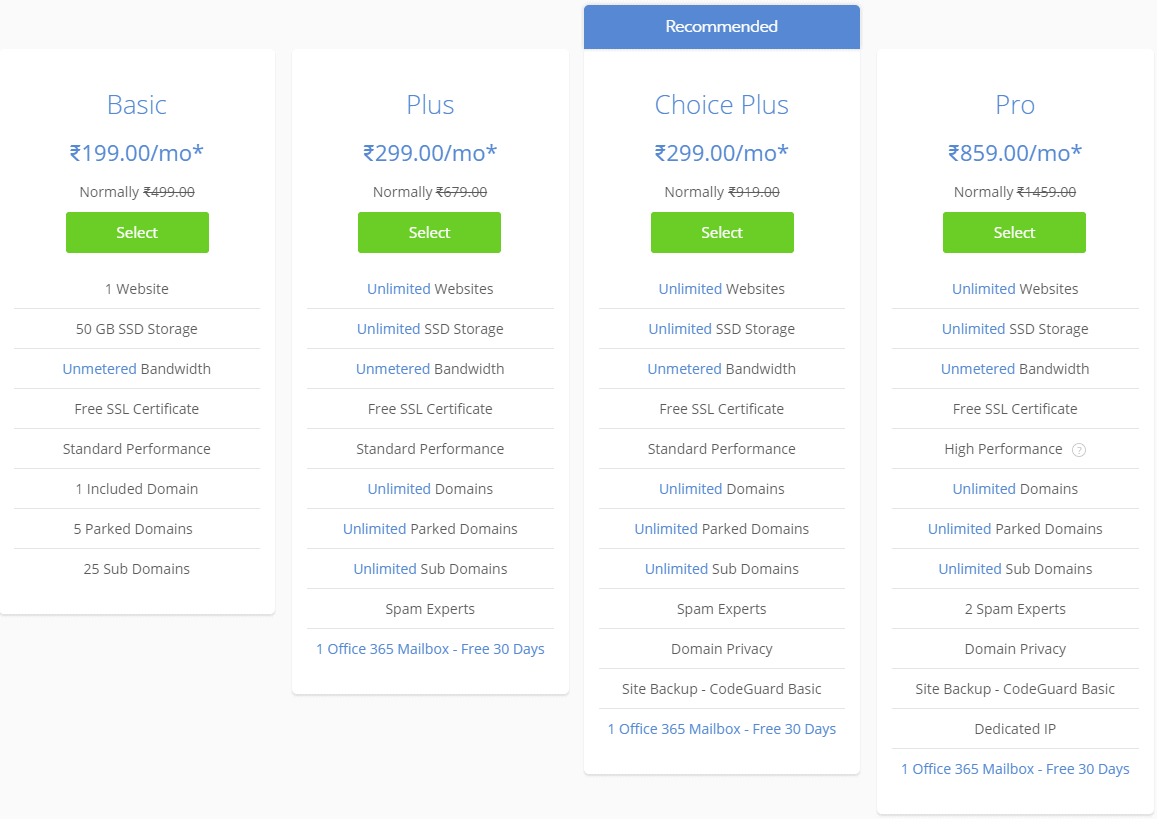
Once there, you’ll have a choice of hosting packages. Just choose whichever one you prefer by clicking on any one of the big green “buy now” buttons.
There are also a few add-ons to purchase. I’d recommend adding Sitelock Security & CodeGuard to ensure your site is always protected against malware intrusion and backed up in the case of an unexpected website crash.
Once you’re done, click on the “Continue to checkout” button.
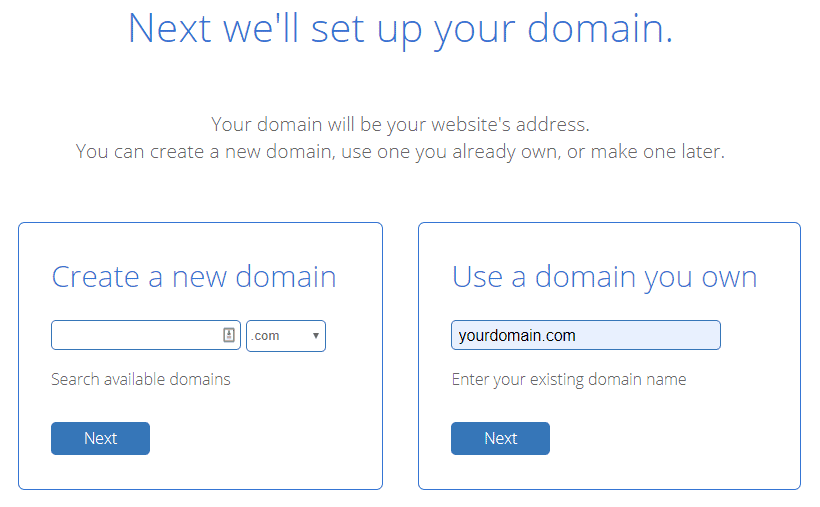
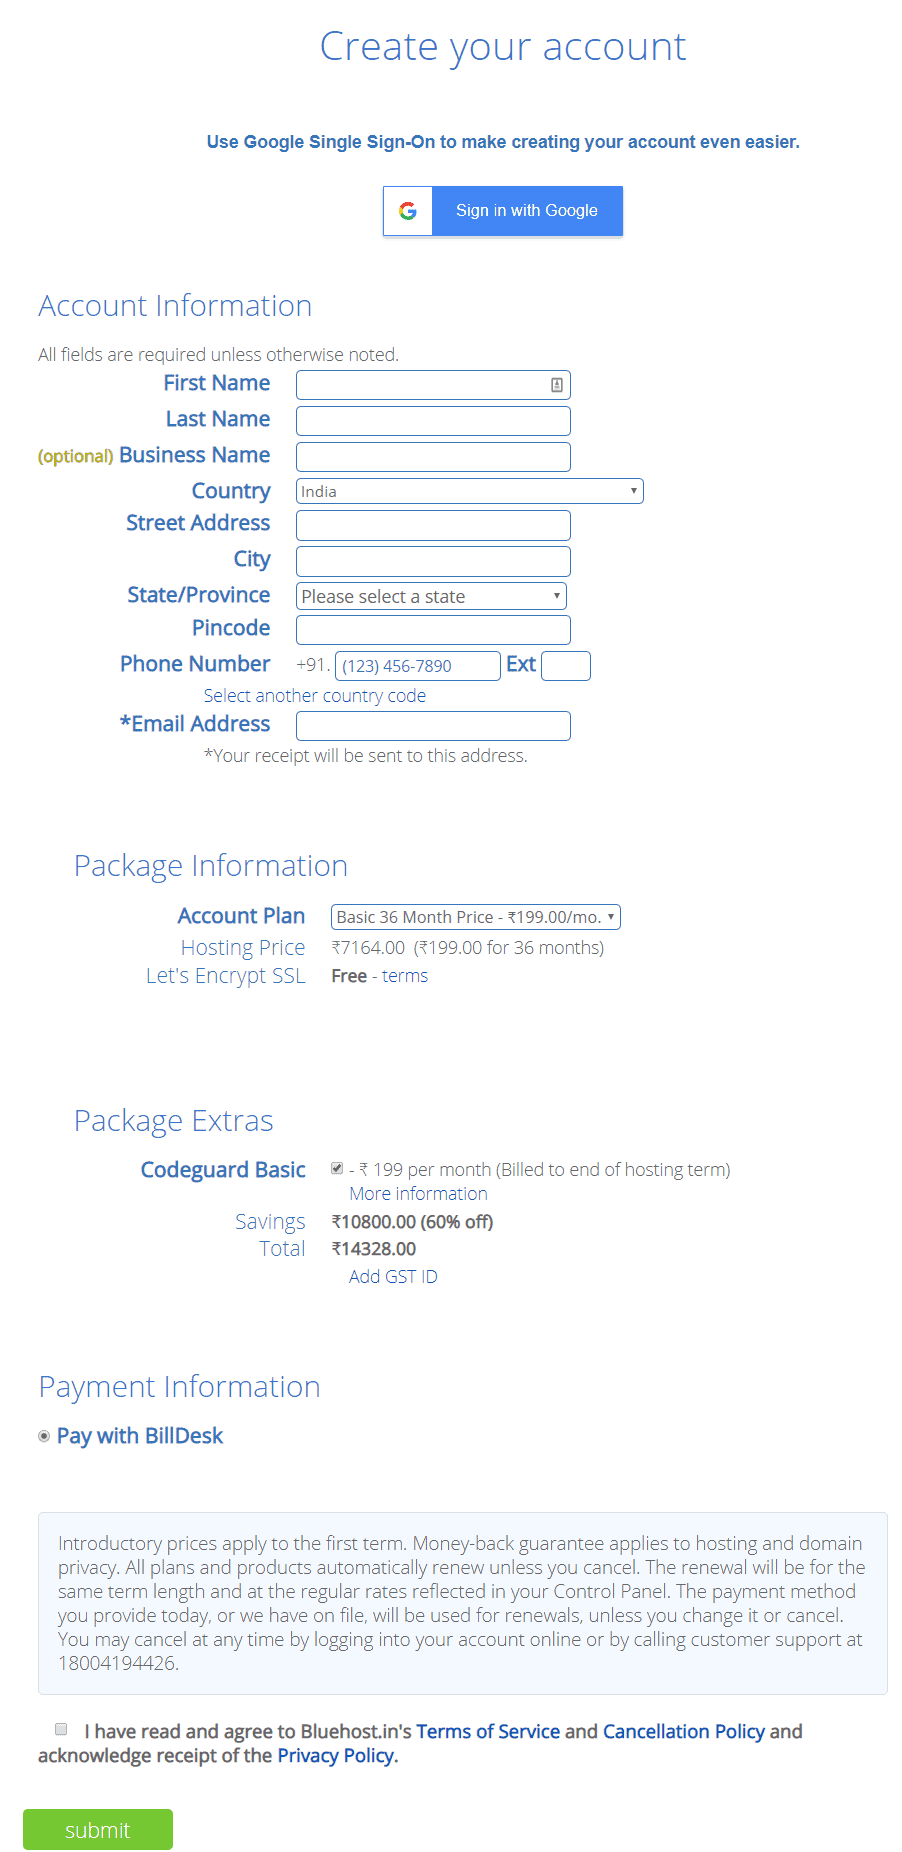
This is how you get a domain name and hosting. Next, we’re going to install WordPress. If you want to check out hosting options other than Bluehost, then here are a few reviews you can read.
#3. How to Set Up A Blog
Installing WordPress is easy and you can do it in just a few clicks. Let’s roll right in.
After applying for an account you’ll receive an email with all of your login details. Keep this information in a safe place for future reference.
Step 1. Go ahead and log into Bluehost.
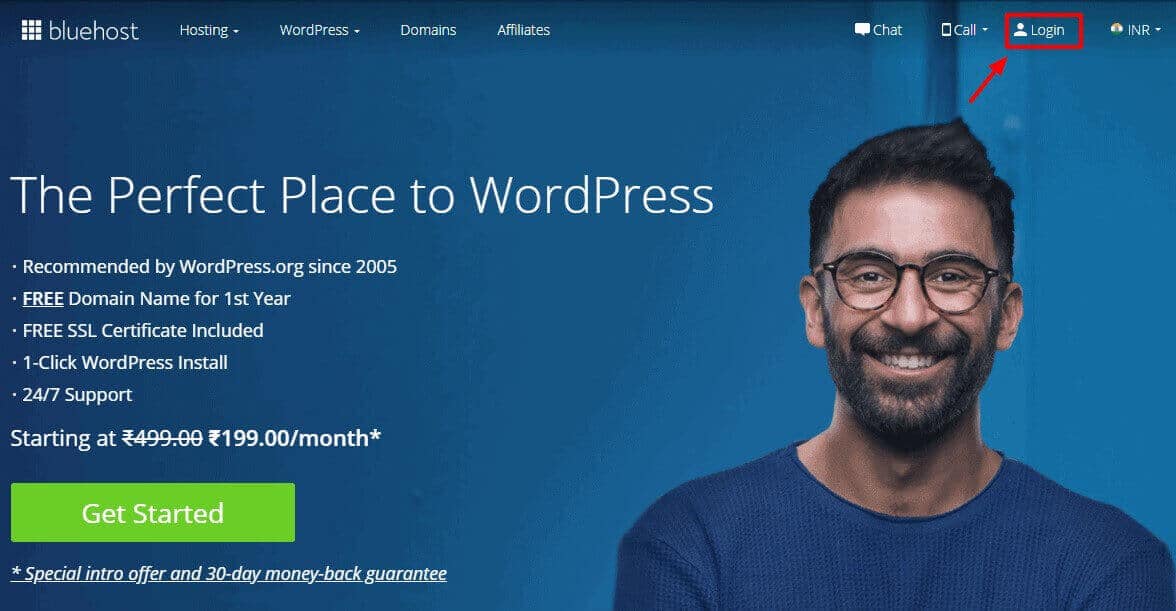
To do that you need to go to the homepage of Bluehost and click the login button in the upper right-hand corner. You could also just click the link in the email you received from Bluehost. Continue to fill in your login details.
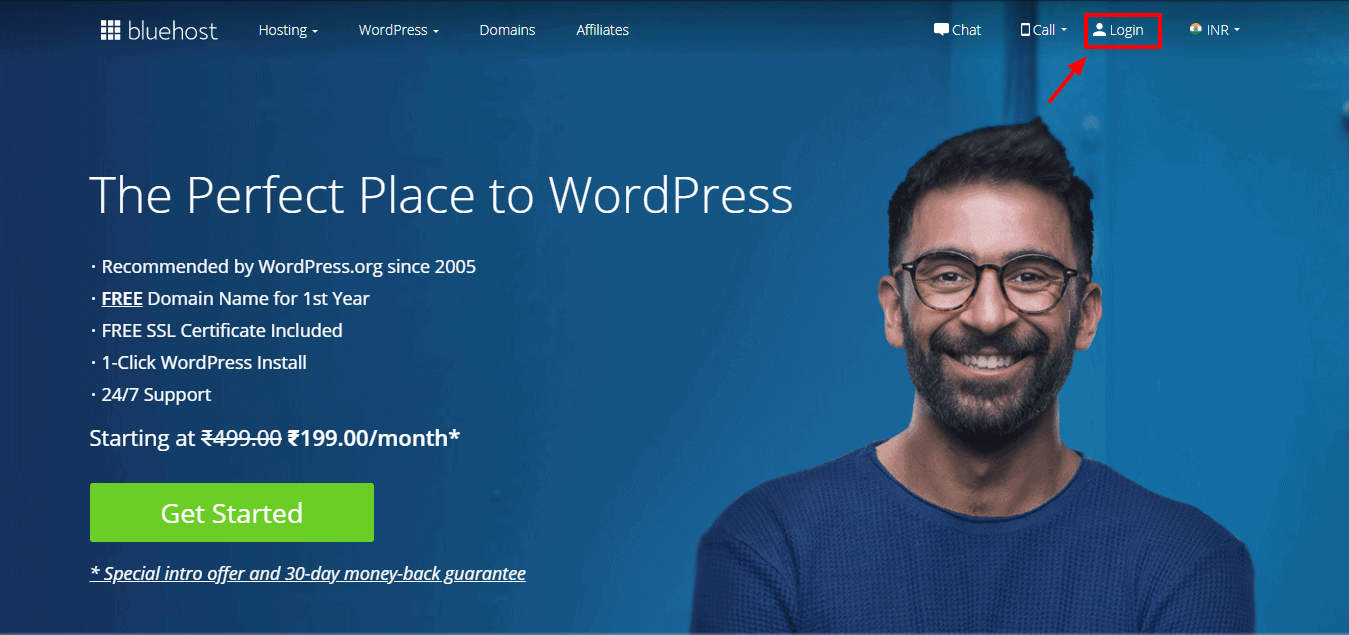
Step 2. Now that you’re in Bluehost you’ll see a page with a lot of little icons grouped into categories.
This is Bluehost Cpanel. The best and most user-friendly hosting software for clients. This software is very well supported and should you have any questions over an issue you’re encountering, you’ll find answers all over the internet.
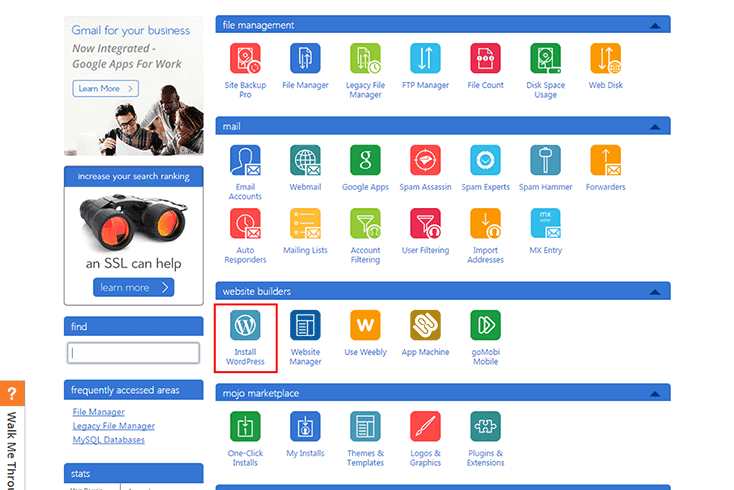
Step 3. Go to the section titled “website builders” and click on the “Install WordPress” icon. Depending on when you follow this tutorial, the graphics in Bluehost might have changed, but ultimately you’ll encounter this window or something similar. Click on the “install” button.
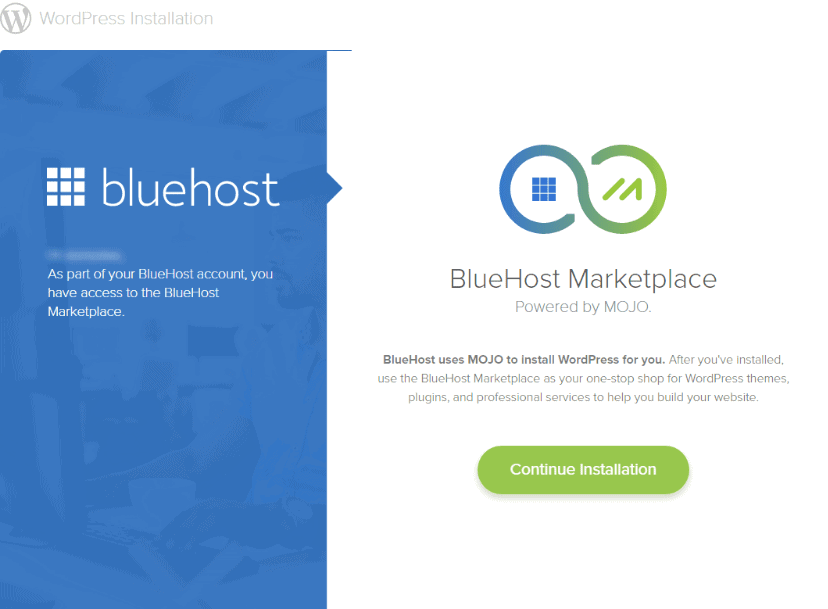
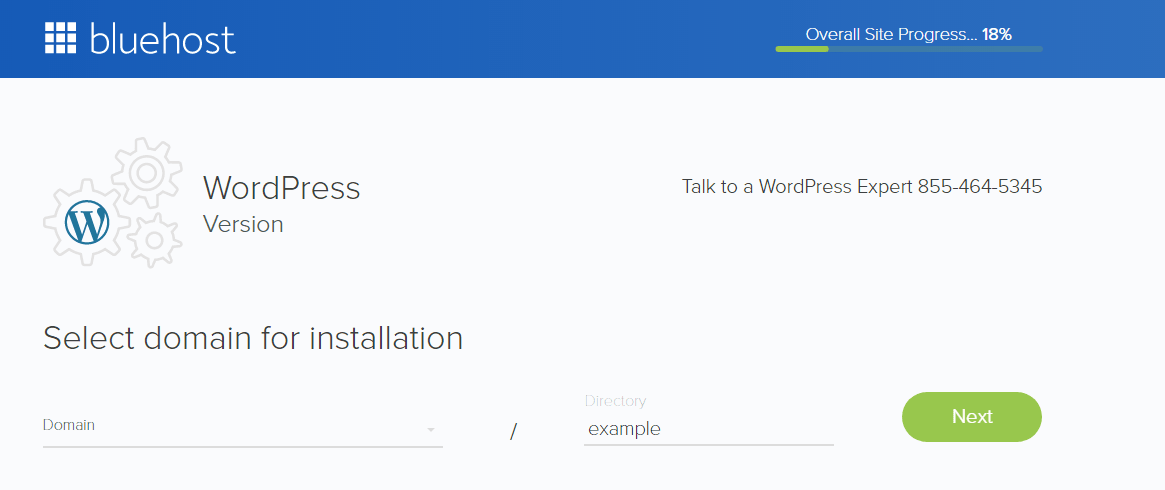
Step 4. Next, you’ll be directed to the section where you choose in which directory you’d like to do your installation. Clicking on the drop-down menu will show you all the domains currently under your account.
Should you want to install WordPress in a different directory under your domain, type in the name of the directory.
Eg. If you want to install WordPress in the blog directory, type “Blog” where you see the word “directory”. Click “Check Domain”
After clicking “Check Domain” the system will see whether everything is OK and spit out the last step.
Further, web hosting is what you need in order
Advanced Options: The last step has a place to tick called ‘Advanced Options”.
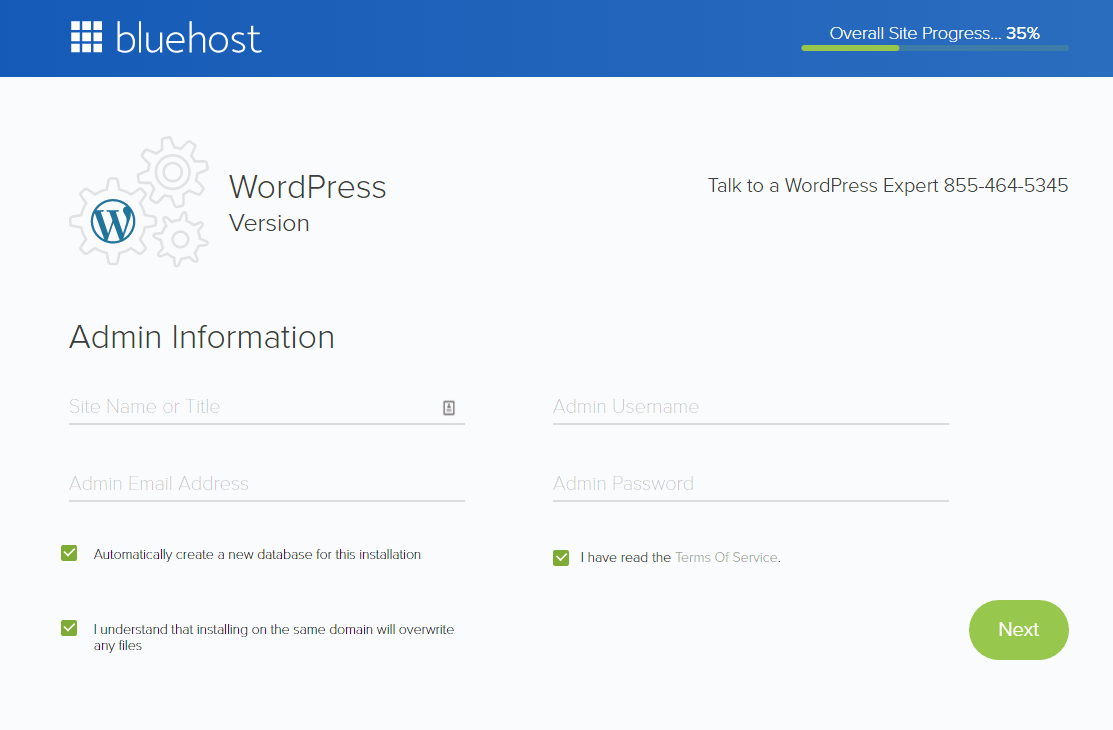
If you click on “Advanced Options” you’ll see that the website builder has given your site a name, an Admin, username, and a password. You can, of course, change any of the information pre-filled out for you.
Please refrain from using “admin” as a username or anything easy like your dog’s name or your birth date. Gone are the days when everything was easy and hackers were known to only target big governmental websites.
I would suggest you use an online password generator to get you a strong password. Most preferably one with 16 characters, with numbers, alphabet, upper and lower-case letters as well as symbols.
Read and agree to the terms. Click the Next button. Congratulations!!!
You now have a WordPress website, installed on your own domain.
Next, we’re going to look at your site and how to change a couple of things on there, to make it look just how you want it to look.
Note: If you have already purchased hosting from SiteGround or DreamHost, then here is the complete guide on how to install WordPress on these web hosts.
#4. The Essential Tweaks For Your Blog
- Logging In And Updating
Once WordPress is installed you’ll receive an email from Bluehost with your WordPress login details. We need to access WordPress’ backend in order to change things like themes and other settings. The URL to access the backend normally looks like this – www.createmyblog.com/wp-login.php.
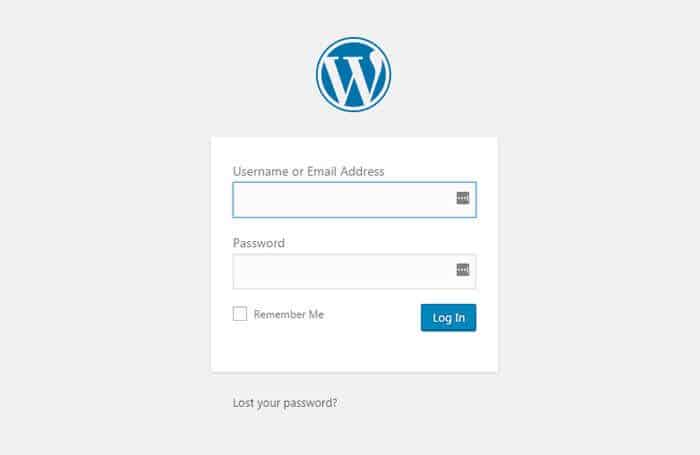
Once there, all you need to do is enter the username and password you created during installation. WordPress will automatically take you to the dashboard.
Before you do anything, you must look at the top left corner of the dashboard and see if there are any update alerts.
The image below shows you exactly where to look for it. In most cases, if there is an update to be done WordPress it will normally indicate that near the top of the page.
It is crucial that you do a WordPress update.
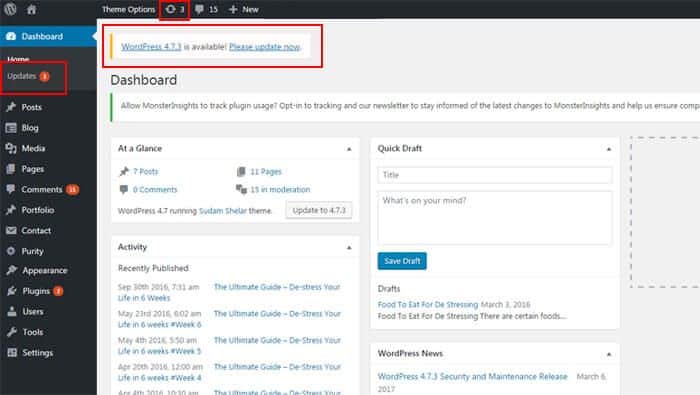
This will help protect your website against possible threats. Hackers target all versions of the WordPress software, but WordPress developers try to stay abreast of any threats by releasing fixes in the form of updates.
You might also have a couple of plugins pre-installed on your WordPress version. Update these as well. Now, that you’ve updated, let’s take a peek at how your site looks.
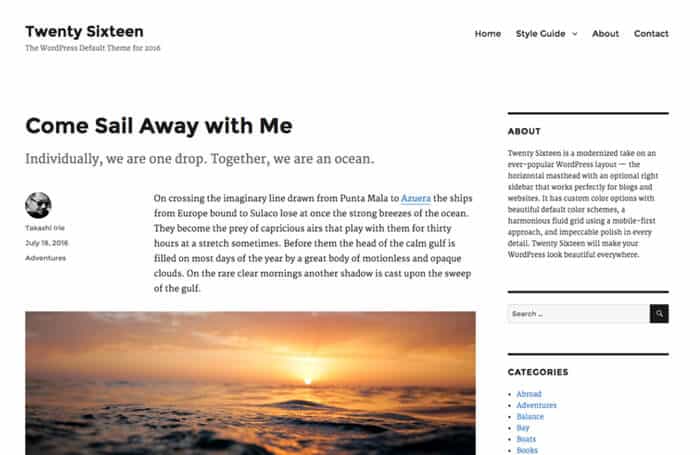
Not much to look at now, but we are going to change that in a bit.
- Change Your WordPress Theme
Your dashboard has a vertical menu on the left. Each of those menu items opens up to more links. To learn about each of those links you can visit WordPress here.
For now, we are interested in the Appearance menu item – Themes. Click it & choose “Themes”
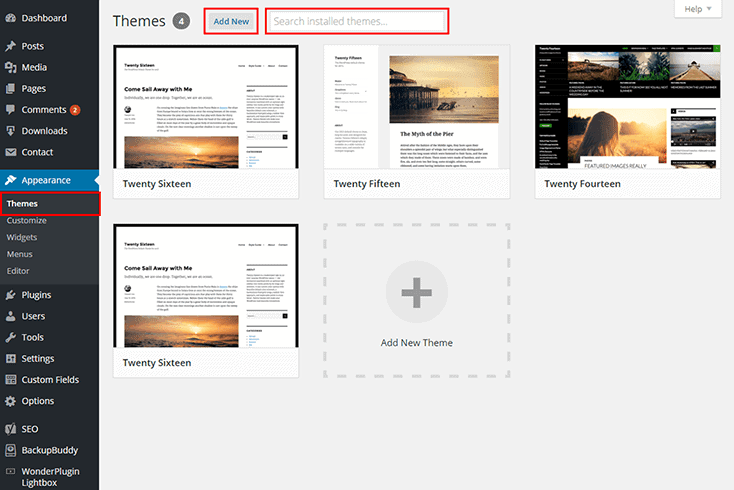
Browse through the themes and choose whichever theme you’d like. Click on “Activate” to activate the theme you’d like.
- About Free WordPress Themes
Through the years I’ve used both free themes and premium themes. I’ve learned a great deal about WordPress customization through using them. They are also great for those creating a blog on a budget or who just prefer to use free themes for whatever reason.
However, you might encounter problems with free themes down the line.
They are not updated regularly, which leaves your site wide open to possible hack attacks. Some developers start out with high hopes when developing a theme. Their expectations might not have been met.
They might not have received the downloads they expected or the star rating to take the theme places, which forces them to abandon the theme completely and focus on other profitable ventures.
Many free themes are also not supported at all. This in itself can be a point of frustration, as you have to figure out many things about the theme yourself. At times because the theme is free, it might not be very appealing to the eyes or possess many features to make things easy for you.
This is why I always recommend shelling out for a premium version. These are four of the most popular places to purchase a beautiful, fully supported premium theme: StudioPress, MyThemeShop, Thrive Themes and ThemeForest.
Also, for starters, you can try out the Sahifa WordPress Theme which is one of the highest selling WP theme on ThemeForest.
- Install A Free WordPress Theme
Installing a free theme is a breeze. Let me walk you through the process.
- Click on “add new’’ on the Themes tab.

- Browse through all the themes presented to find the one that you like. There are different ways to browse through the themes. You can do so via featured, popular, latest or favorite.
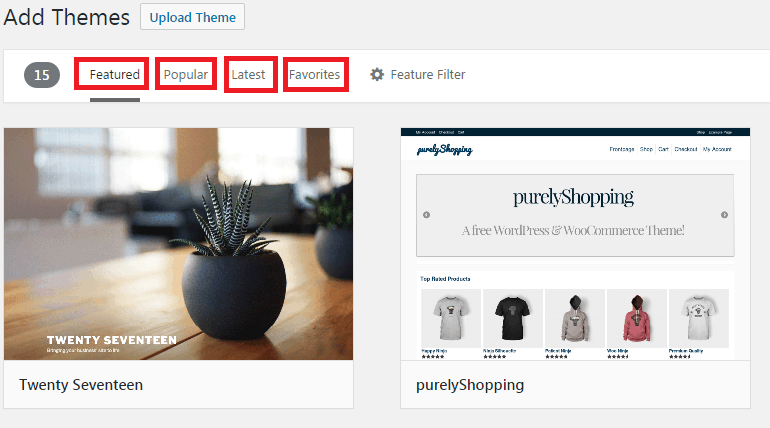
- You could also apply a feature filter that allows you to dig deeper into what type of theme you’d like to apply to your WordPress installation. Click on Feature Filter and tick on a feature you’d like to add. WordPress will go through its database to choose the right type of theme for you.
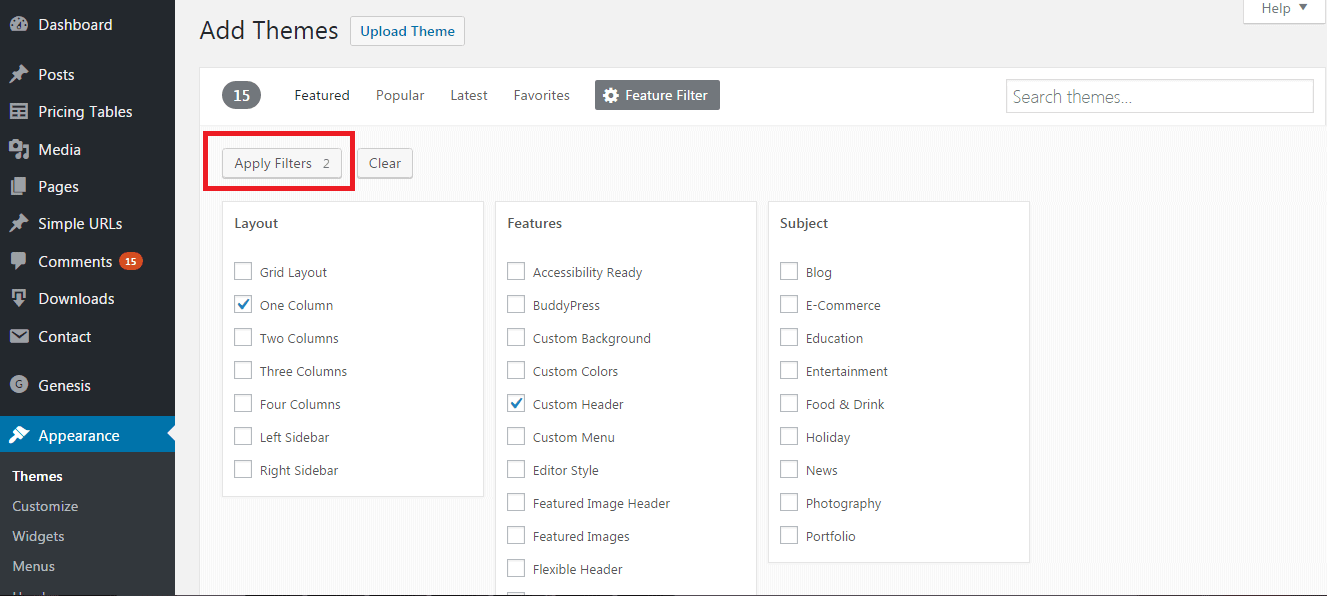
Once you’ve identified the features your ideal theme should have, click on “Apply Filters”. You’ll be presented with a number of themes that adhere to the requirements you chose. Browse through the themes and choose the one you like.
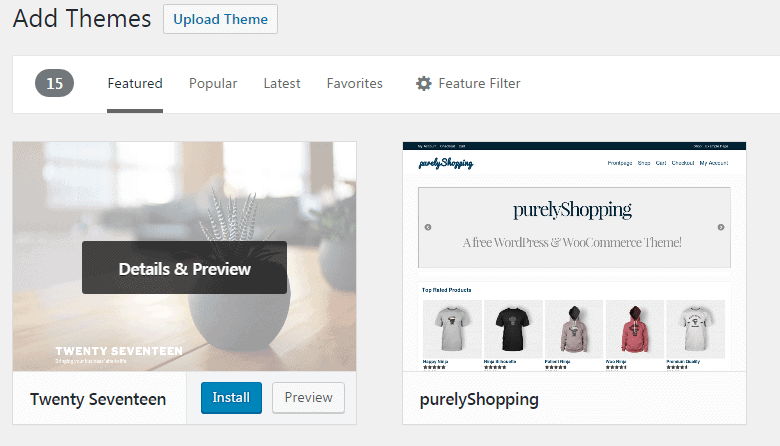
When hovering over the themes, the images will grey out and you can either choose to see the details of the theme or preview it. You can also install the theme immediately, by clicking on the install button. Once you’re done installing the theme, you would have to activate it.
Alright, that’s how you change the look of your site.
- Install Essential WordPress Plugins
A WordPress website feels almost empty without plugins. Plugins are the butter on the bread of your WordPress theme.
Almost like a car without lights. Although you can drive it around town during the day, it definitely becomes a problem at night. There are so many WordPress plugins out there and many of them do a really good job.
What we’re going to install though are those that I think are truly essential and that you cannot start a WordPress blog or website without them.
To install a plugin you click on Plugins – Add New
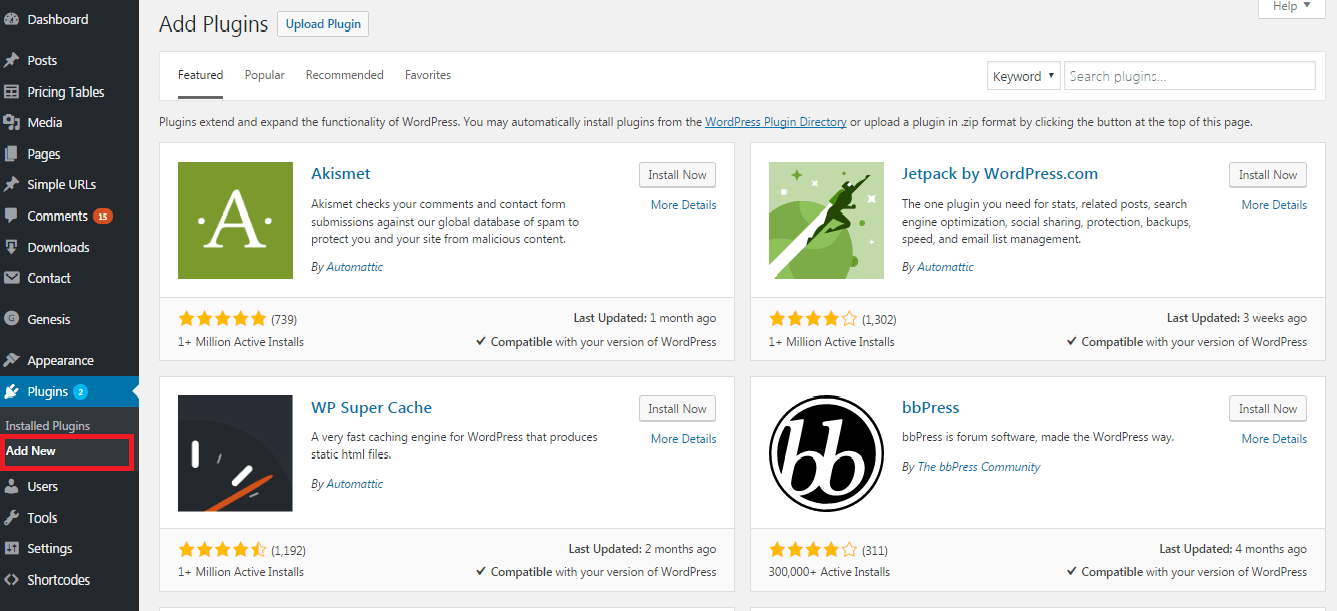
Type in the name of the plugin you’d like to install on the far right. Go through the list of plugins presented and choose the right one. Then, click “Install Now” followed by “Activate”
- Essential WordPress Plugins
- Akismet
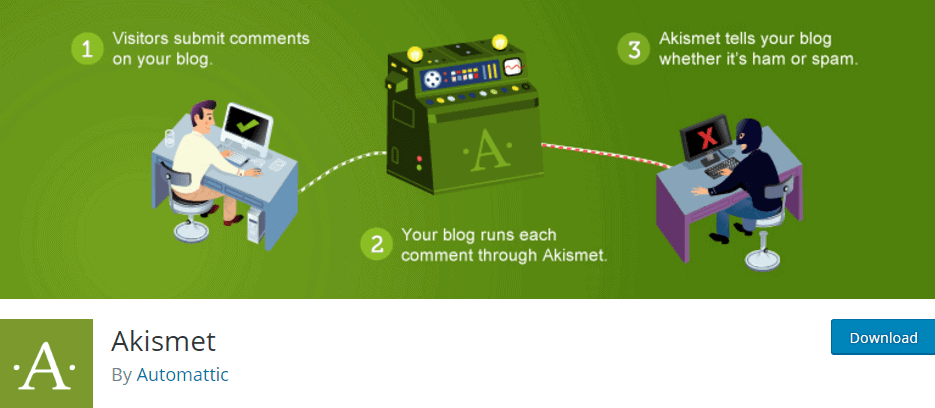
What Akismet does is check comments left on your blog against their own web service. The Akismet Web Service goes through all your incoming comments, checks to see whether they look like spam or not. It then places it in your comments section for your further review.
Features included in Akismet:
- Checks all your comments and removes those that look like spam.
- There is a status history of each comment. So that you’ll be able to see which ones were cleared by Akismet and which ones are considered spam.
- You’ll be able to see the URLs of each comment. In this way, you can determine whether comment links are misleading or not.
- There is a discard feature. It blocks all spam that is of the worst degree to save you disk space and speed up your site.
The one thing that you need, to be able to use Akismet, is an API key. These keys are supplied by the Akismet developers. A good thing though is that you can use one Akismet key on multiple websites.
- Disqus Comment System
Features included in Disqus:
- Your comments are threaded. Nice feature. You can follow the pattern of replies.
- You get notified of new comments by email.
- Admin tools and moderation level is above the normal WordPress commenting system.
- Filters spam and blacklists users.
- Huge community for discussing problems and issues.
- WP Smush
Features included in WP Smush:
- Lossless compression is used to optimise your images.
- You can set your maximum width and height and large images will scale down before they are added to your media library.
- WP Smush processes jpg, gif and png images.
- It also auto smushes your attachments when uploading.
- Option to smush your images individually or in bulk of 50 images at a time.
- It smushes web-sized images 1MB or smaller.
- Pretty Link Lite
Instead of having links that look like this: http://secure.bluehost.com/%7Eaffiliat/cgi-bin/affiliates/clickthru.cgi?id=xxxxxx
They can be cloaked to look like this: www.createmyblog.com/recommends/bluehost
That’s pretty neat, right?

Features included in Pretty Link Lite:
- Create simple URL’s on your website that redirects to another URL. (it allows 301 and 307 redirects only)
- Can generate random characters as slugs for your URL. Characters are 3-4 letters long.
- It can track the number of hits per link.
- It can also track the unique hits per link.
- It provides you with a report where you can see the clicks per day. You can configure this chart based on the specific links clicked, the date and the unique clicks.
- You are able to view details such as IP addresses, the operating system, the source of the traffic and the remote host.
- You can also download the hit details in CSV format.
- Shareaholic
Features included in Shareaholic:
- Share and follow buttons are SVG (vectors).
- There are share counters for Twitter, Facebook, LinkedIn, Pinterest, Buffer, Google Plus and much more.
- You get support for some URL shorteners like Google’s goo.gl and Google Analytics.
- Other URL shorteners supported are bit.ly, including its custom tracking, j.mp, TinyURL, and shr.lc.
- There is also support for: Facebook, Twitter, Pinterest, Google Plus, Reddit, LinkedIn, Gmail, Delicious, OneNote, Evernote, Stumbleupon, Digg, Tumblr, Hootsuite and more.
- Integration into Google Analytics.
- It also supports theme features: HTML5, XHTML, post formats, widgets and infinite scrolling.
#5. How To Create That First Blog Post
To create a blog post, you need to head on over to Posts – Add New Post

This will open up a new Posts page and you’re ready to start blogging!
Before you dive in, there’s something else you must look at first. All posts must belong to a particular category. So, the first thing we do is we create different categories or we create them as we go along.
You’re in luck as I’m going to show you both ways.
A. Creating A Category In The Post
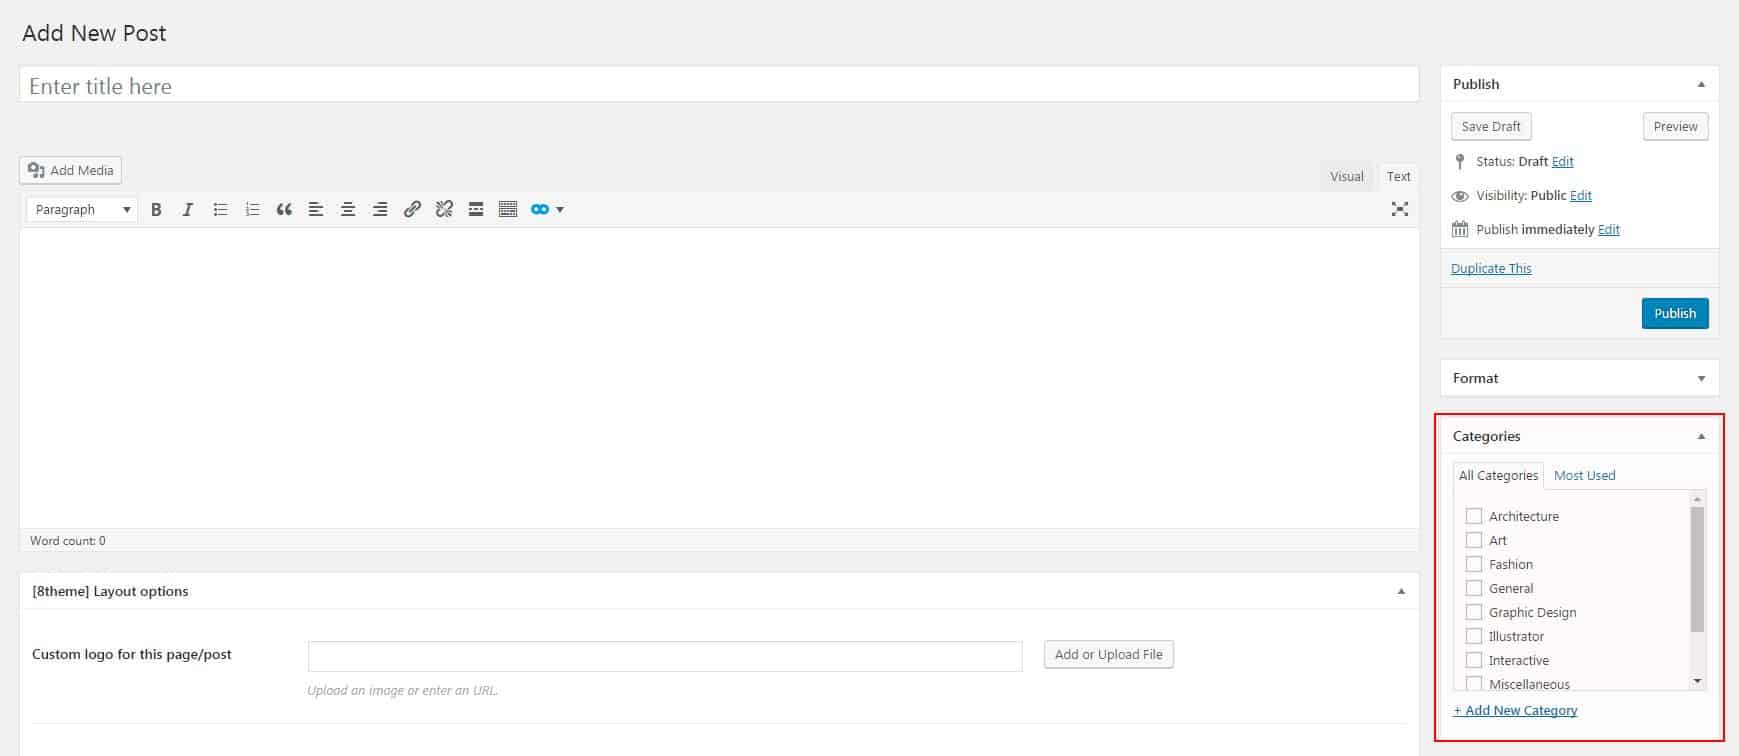
Inside your post on your right side, just under the Publish tab, you’ll find the Categories tab. Click on “+Add New Category” and type in the name of your new category.
Once it’s added, all you have to do is select it and your post will belong to that category.
B. Creating A Category Through The Left Sidebar
This method requires you to click on Posts – Add New Category
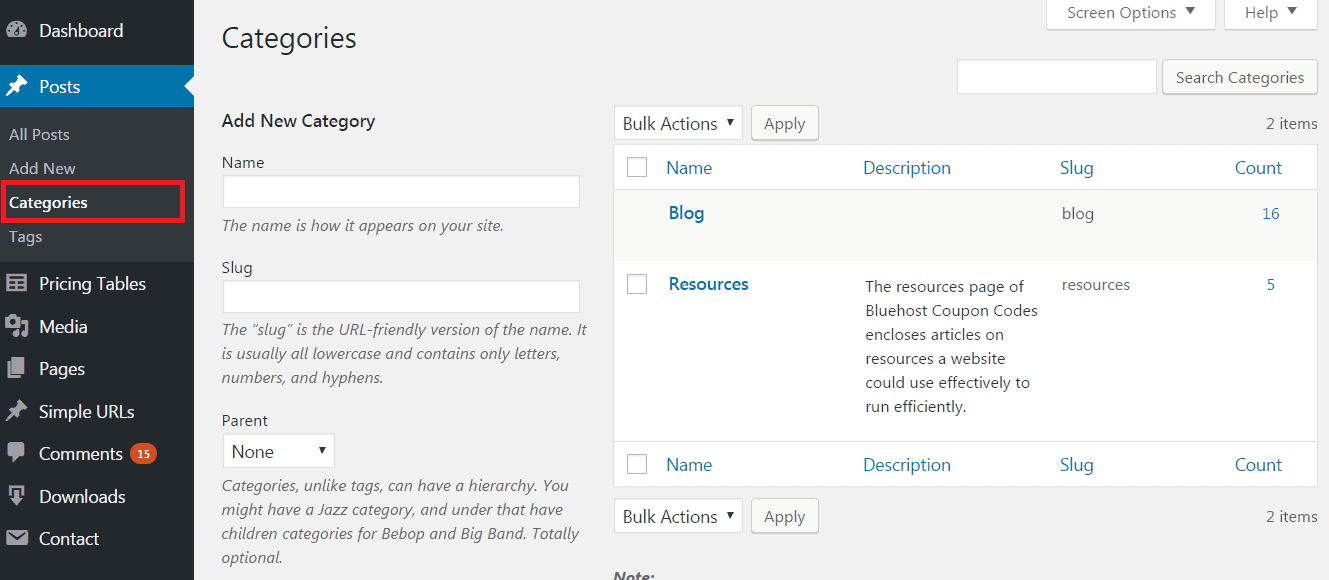
On the Categories page, type in the name of your new category on the left-side. Next type in the slug. The slug is basically just an URL-friendly version of the name.
Next choose whether this category fits into another category, basically if it is the parent or not.
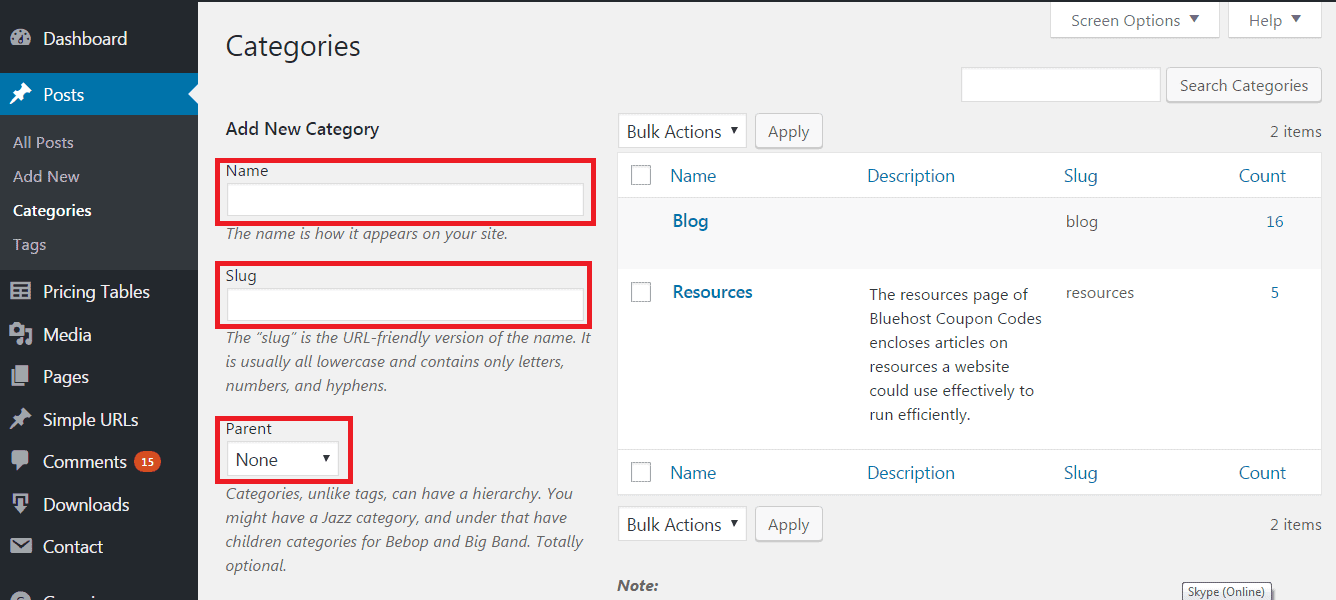
Remember, you can also create all of your categories in one go and just link to them as you create your blog posts. When creating categories try to have them be as descriptive of the posts as possible. It’s less confusing to the readers of your blog.
Now that we have that out of the way, let’s begin with how to start blogging.
C. New Blog Post
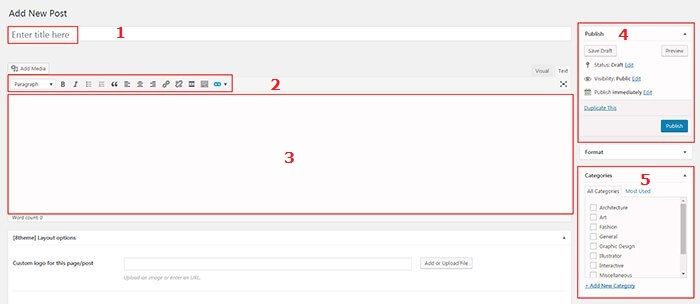
What you’re seeing above is the “new blog post” window. We’re going to break down every area as you see numbered.
- 1. Enter Title Here: This is the area where you enter the title of your post. Remember to always keep the title descriptive as well as relevant to the post you’re about to write.
- 2. Basic Editing Tools: These are the tools you use to edit the contents of your post. There are basic tools like font, bold, italic, underline, font colour, alignment and much more.
- 3. Content Area: This is the area you use to type in the contents of your blog post. If you’ve ever worked with a word processor like Microsoft Word or even Notepad you should be fine using this. You can also add images or video to your posts.
- 4. Publish Your Post: In this area, you get to decide when your post is published for the world to see. If you don’t want the post to be visible to the outside world you can save it as a draft. You can also schedule publication to a future date and WordPress will automatically post for you.
- 5. Additional Customization: This area and the areas below this one can be used to further customize your post. You can choose which category this post will belong to, you can also decide whether this post will belong to any particular parent. You can also load a featured image from here.
D. Creating Your Web Pages
We’ve created a blog post above. A web page can be done in about the same way. The only main difference is that you access the “pages tab” instead of the “posts tab” to add a new page.
To add a page, go to Pages – Add New
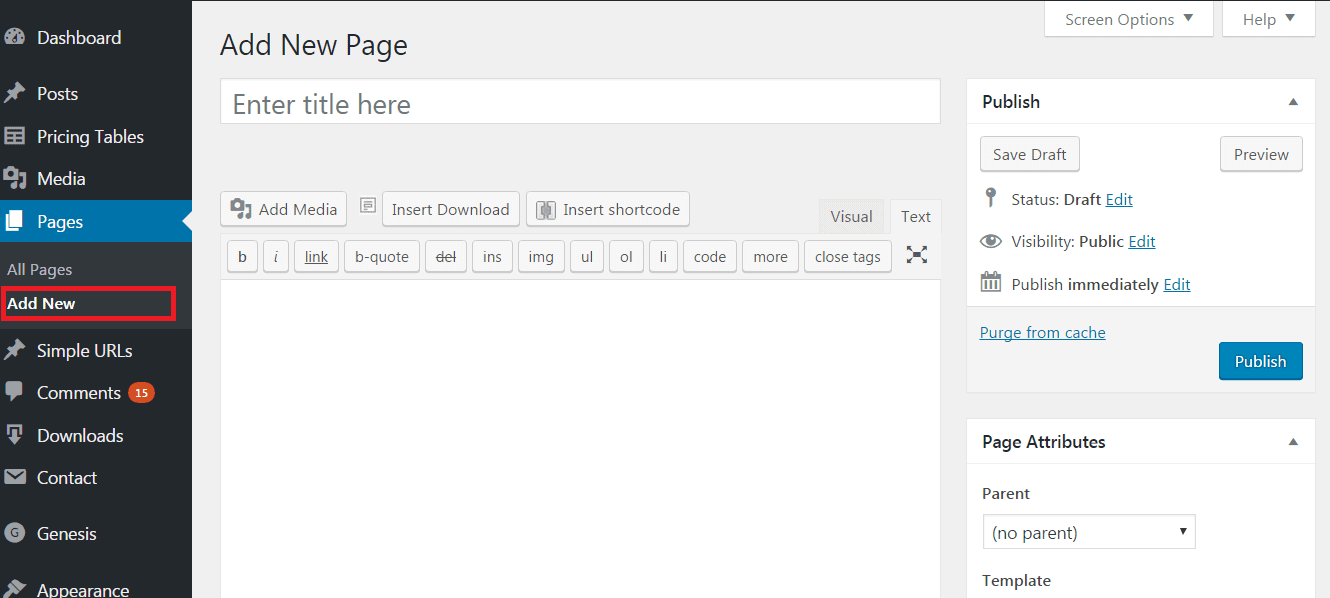
You might be wondering what the difference is between pages and posts. Not much really, except for the following:
A post is mostly a flow of different thoughts, ideas or knowledge. In most cases, posts are created on a continuous basis, informing the reader of something new.
Pages, however, serve as static areas of information. They occupy a particular place on the blog and very rarely do they rotate continuously like the post.
There are a couple of pages that are customary to have:
- The Homepage: The front page of your blog can be a place where all your recent posts are shown in order of appearance or it can be a static page. This means that you create a page, design it as you wish and let it serve as the homepage.
- The About Page: The About page is used to tell the world or your visitors about you. It is a frequently visited page as it shows who you are and what your intentions were in starting your own blog.
- The Contact Page: The Contact page is the place where your visitors can interact with you by leaving a message for you. Normally, here you’ll display various ways you can be reached. Whether it be by phone, email, Twitter, Facebook or any of a large variety of ways to be reached.
E. Creating Your Menu
The menu is the area below or next to your logo, where you have links to various pages or categories on your blog. To create a menu, click on Appearance – Menus

You use the left side of the Menus page to select the pages, posts, categories or links you’d like included on the menu. You have to drag the items you want from the left on to the “Menu Structure.” Depending on how many menus your theme supports you can assign different items to different menus.
#6. The Security Of Your Blog
The security of your blog is one of the essential things you have to look at. If you get hacked you have to ensure that you can get a working copy of your website up and running again.
If you’ve selected a web host that will do automatic backups for you then you’ve done half of the work. The other half is to ensure that you keep a backup of your site as well. Read this WordPress backup guide to learn more.
I know, it can be a pain but a pain I wouldn’t mind going through. Especially when I remember the pain I had to go through to reconstruct about 8 websites after being hacked.
Now, I dare not backup…at all.
Two plugins, I use all the time to ensure I stay safe are Wordfence and All-In-One-Migration.
1. Wordfence
Wordfence is a security plugin, powered by the Threat Defense Feed and has a Web Application firewall that stops you from being hacked.
Wordfence will also alert you in case your site is in danger of being hacked. It will give you visibility into real-time hack attempts.Basically, what Wordfence does is alert you when a file is changed on your server by a hacker or even by yourself.
This is the most downloaded security plugin on the web. I’d suggest you download it as well. Oh, and it’s free.
2. All-in-One WP Migration
All-in-One WP Migration serves as a complete backup of your website. It’s quite powerful, as it allows you to backup the content and databases of your website.
It is downloadable as a file, which you can use again as an import into your hacked website. However, you have to wipe the website clean in order to get rid of all the malware and hacked content.
#7. Traffic, Promotion And Making Money
1. Create Epic Content

Your blog is not complete if you do not put on some really epic stuff on it. Now, before you get all confused with all of the stuff they tell you out there regarding manipulating the search engines and such, remember that the best websites are a combination of:
- Really great content that makes the readers want to read, or watch if it’s a video.
- A subtle adding of SEO.
Please note that it’s not the other way around. It’s that “other way around” that has caused many to lose their rankings during the famous Google zoo updates.
Read this guide to know the common SEO mistakes that can kill your blog and website.
Before you do anything, think things through. You want to think of what humans like to read. What would you like to read if you happen to visit your website?
I’m sure not some funny stuff that doesn’t make sense or were just written as fillers.
First, figure out what topics you’d like included on your site. Although it involves a bit of work, find a keyword research program that can tell you how best to position yourselves while covering those topics you chose.
What I mean with that is, once you found your topic ideas, see if you can with the help of keyword research, manoeuvre the words around, so that, although it is still the same topic, it is now more SEO friendly and will easily help you rank.
Brainstorm for content ideas and see if you can find around 20 different topics.
2. Tips On Creating Great Content

Creating great content is not easy. Therefore, here are some links to help you out as you’re preparing your blog for epic content your readers will love:
- Create a content marketing strategy. This will help you generate leads as well.
- Your blog posts must be strong and clear. Learn about it in this guide.
- Start by reading more, you will begin to think like a writer.
- Include images, quality images. Also, add headings and two to three line paragraphs.
- When writing, think of a problem you can help your reader solve.
Also, here’s a cool schedule you can follow and become a better blogger in 30 days and here’s how you can learn to create strong headlines. Remember, you’ve got to have compelling headlines.
3. Promote, Promote, Promote
Next, you’ve got to promote your blog so that more eyes see your content. More traffic to your site means more money your way. Turning a blog into a profitable business is doable if there’s enough traffic.
So, to have a blog with traffic that pours in day and night, you’ve got to follow these guidelines:
- Determine the overall direction of your blog. What is your content plan?
- Next, make sure you have a social media profile for your business. Determine which of your content you’ll share?
- And thirdly, you’ve got to know something about blog post SEO for organic traffic.
4. More Tips On Promoting Your Blog
Below I’ve included a couple of links that will help you get to know more about SEO and getting traffic for your blog:
- This is a great post on SEO, Google guidelines and usability.
- When on social media make sure to share relevant content. Make your content sharing a mixture of videos and text. Also share things from other bloggers, which are relevant.
- Also, check out this blog to know the effective tips for promoting your blog on Facebook.
- Open an account on Quora and answer questions. This is a top-notch way of gaining traffic back to your blog.
- Reddit is a good place to gain relevant traffic from. Post on Reddit, in the relevant subsections.
- Use republishing to get featured on large websites.
- Guest blog on other websites.
#Conclusion
This is not all there is to setting-up a WordPress blog. Each of the steps I described can be further analysed and elaborated upon. Much more can be added to a blog than what I’ve outlined here.
But if you follow all the steps of this how to start a blog guide that I have outlined here diligently, you’ll be well on your way to having a great looking blog.
And that’s a wrap!
Leave a Reply